1
2
3
本套课程: 云原生+边缘计算+KubeEdge,打造智能边缘管理平台.// pan.baidu.com/s/ 133 xD_Athr5dXYYNaUtBMRw
云原生概述
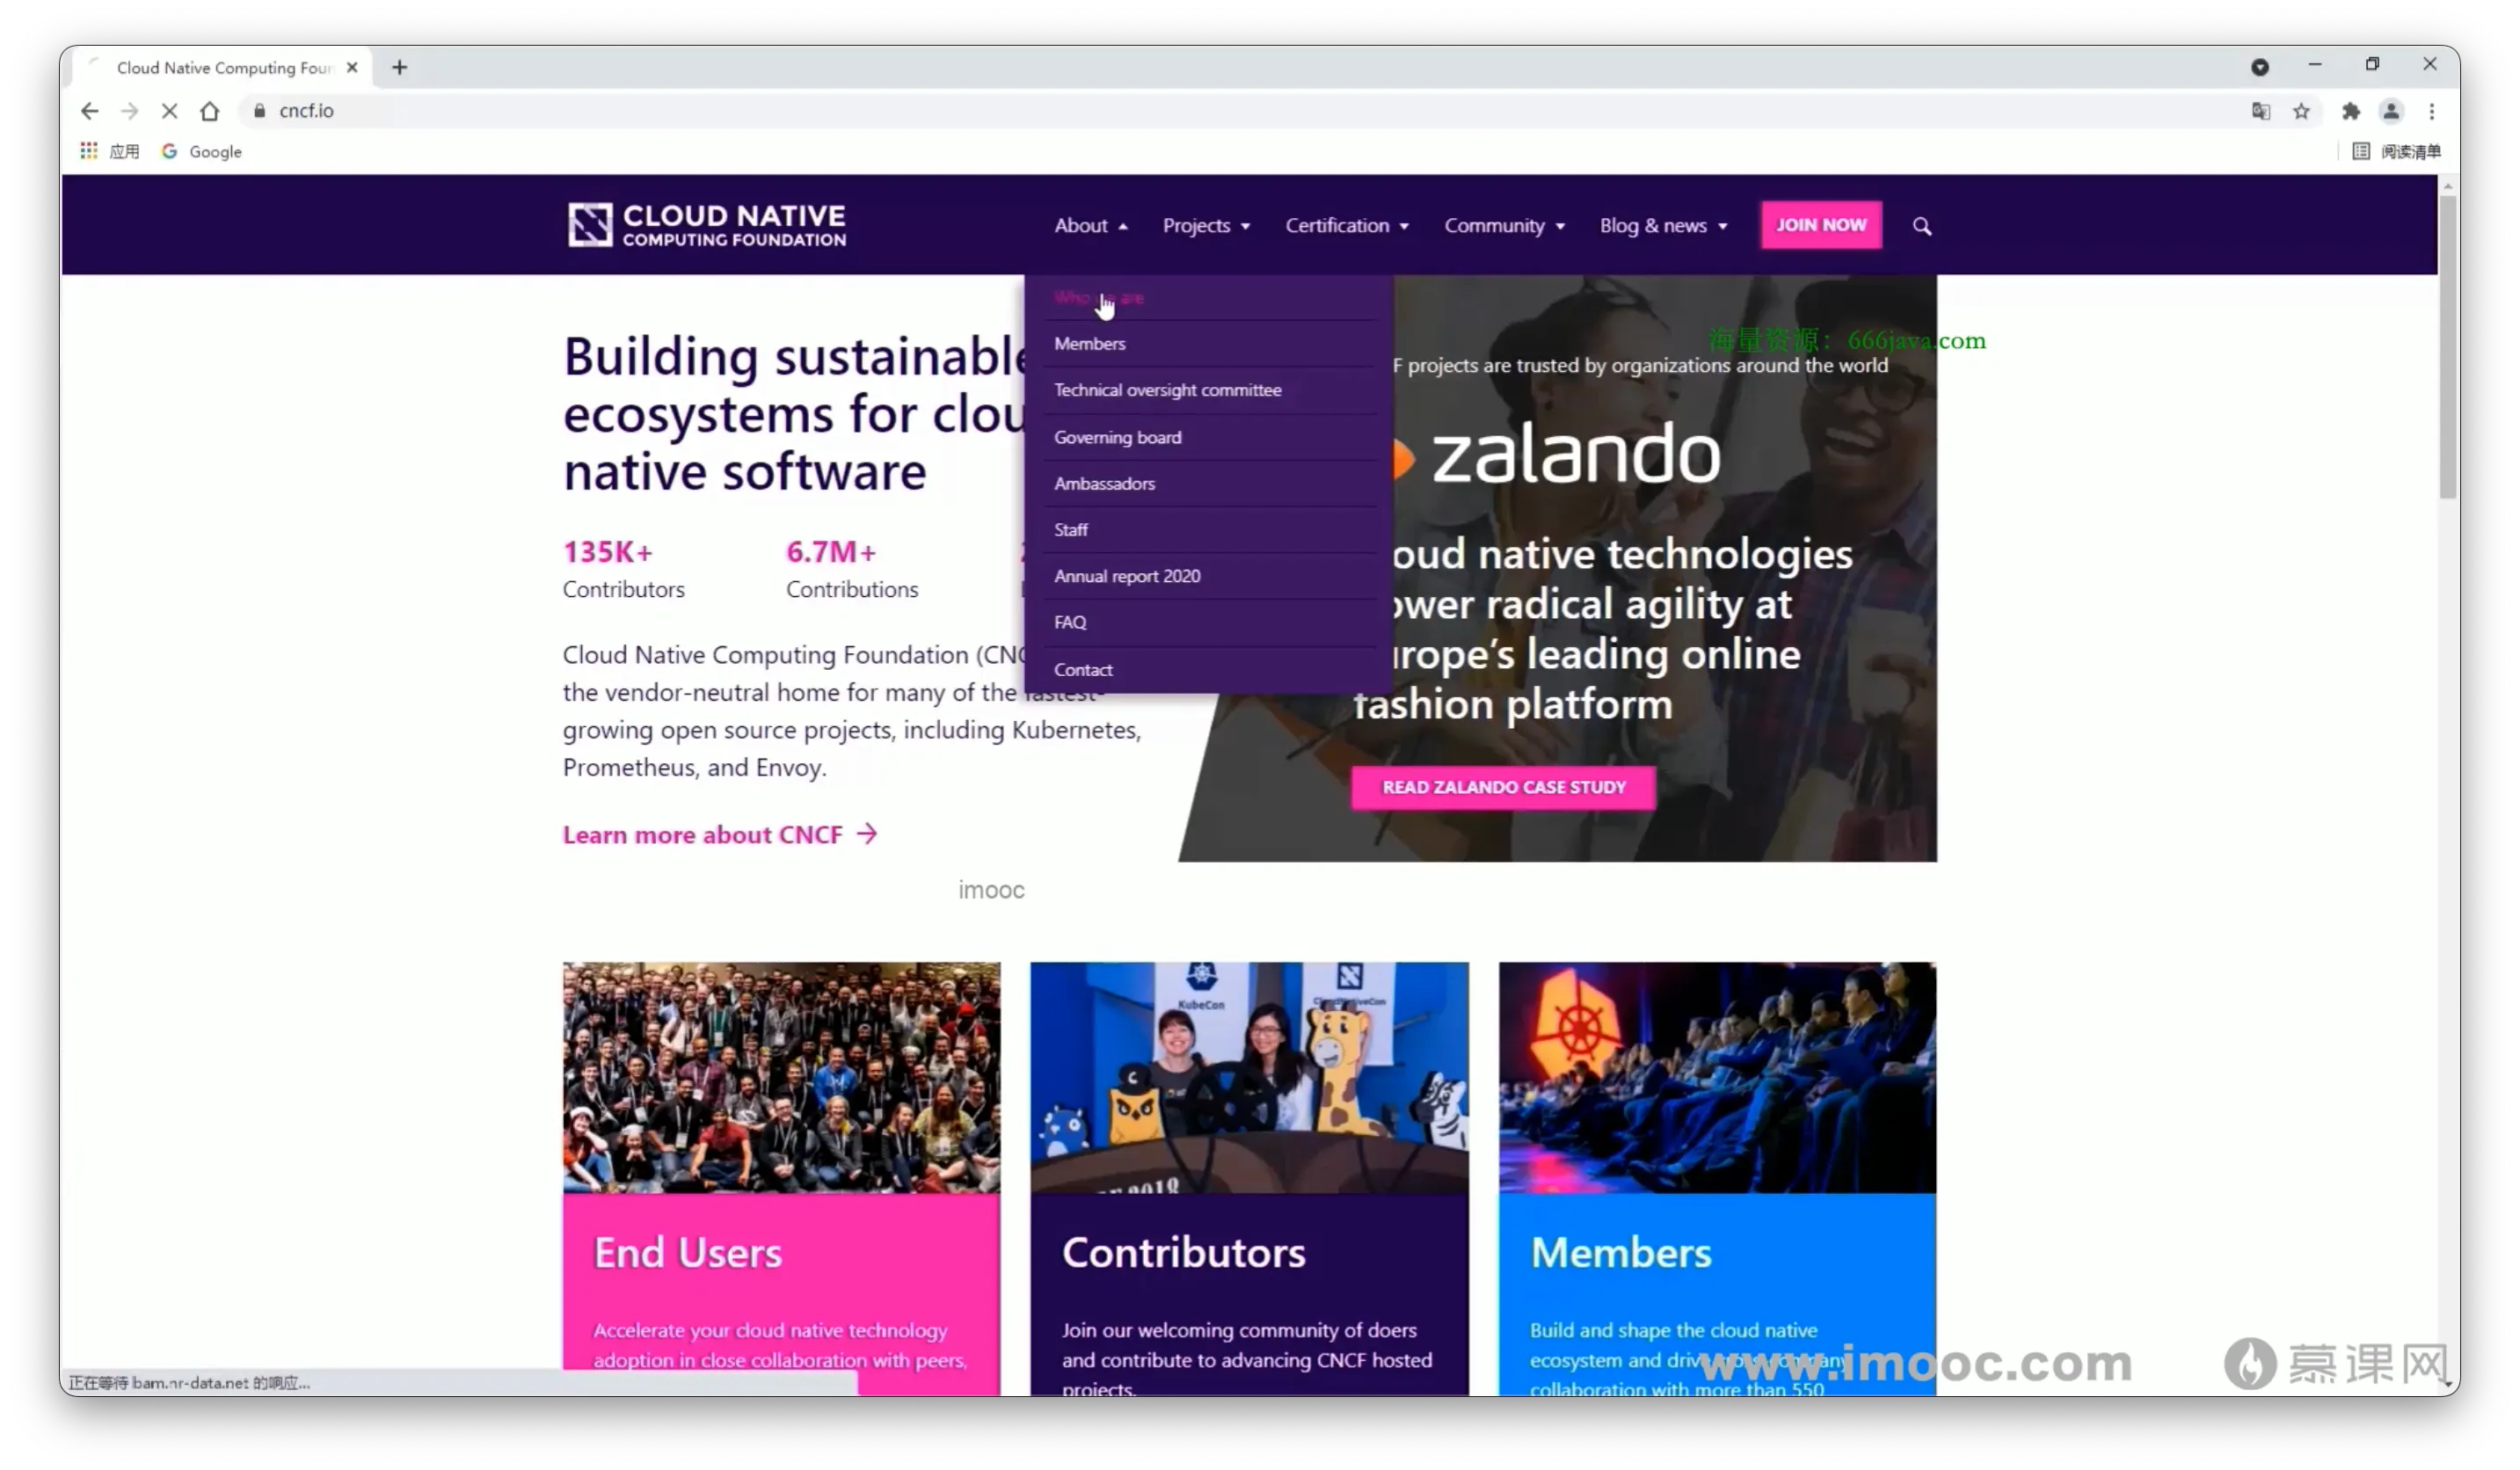
We bring together the world’s top developers, end users, and vendors and run the largest open source developer conferences. CNCF is part of the nonprofit Linux Foundation .
Cloud Native Definition 云原生定义 Cloud native technologies empower organizations to build and run scalable applications in modern, dynamic environments such as public, private, and hybrid clouds. Containers, service meshes, microservices, immutable infrastructure, and declarative APIs exemplify this approach.
These techniques enable loosely coupled systems that are resilient, manageable, and observable. Combined with robust automation, they allow engineers to make high-impact changes frequently and predictably with minimal toil.
The Cloud Native Computing Foundation seeks to drive adoption of this paradigm by fostering and sustaining an ecosystem of open source, vendor-neutral projects. We democratize state-of-the-art patterns to make these innovations accessible for everyone.
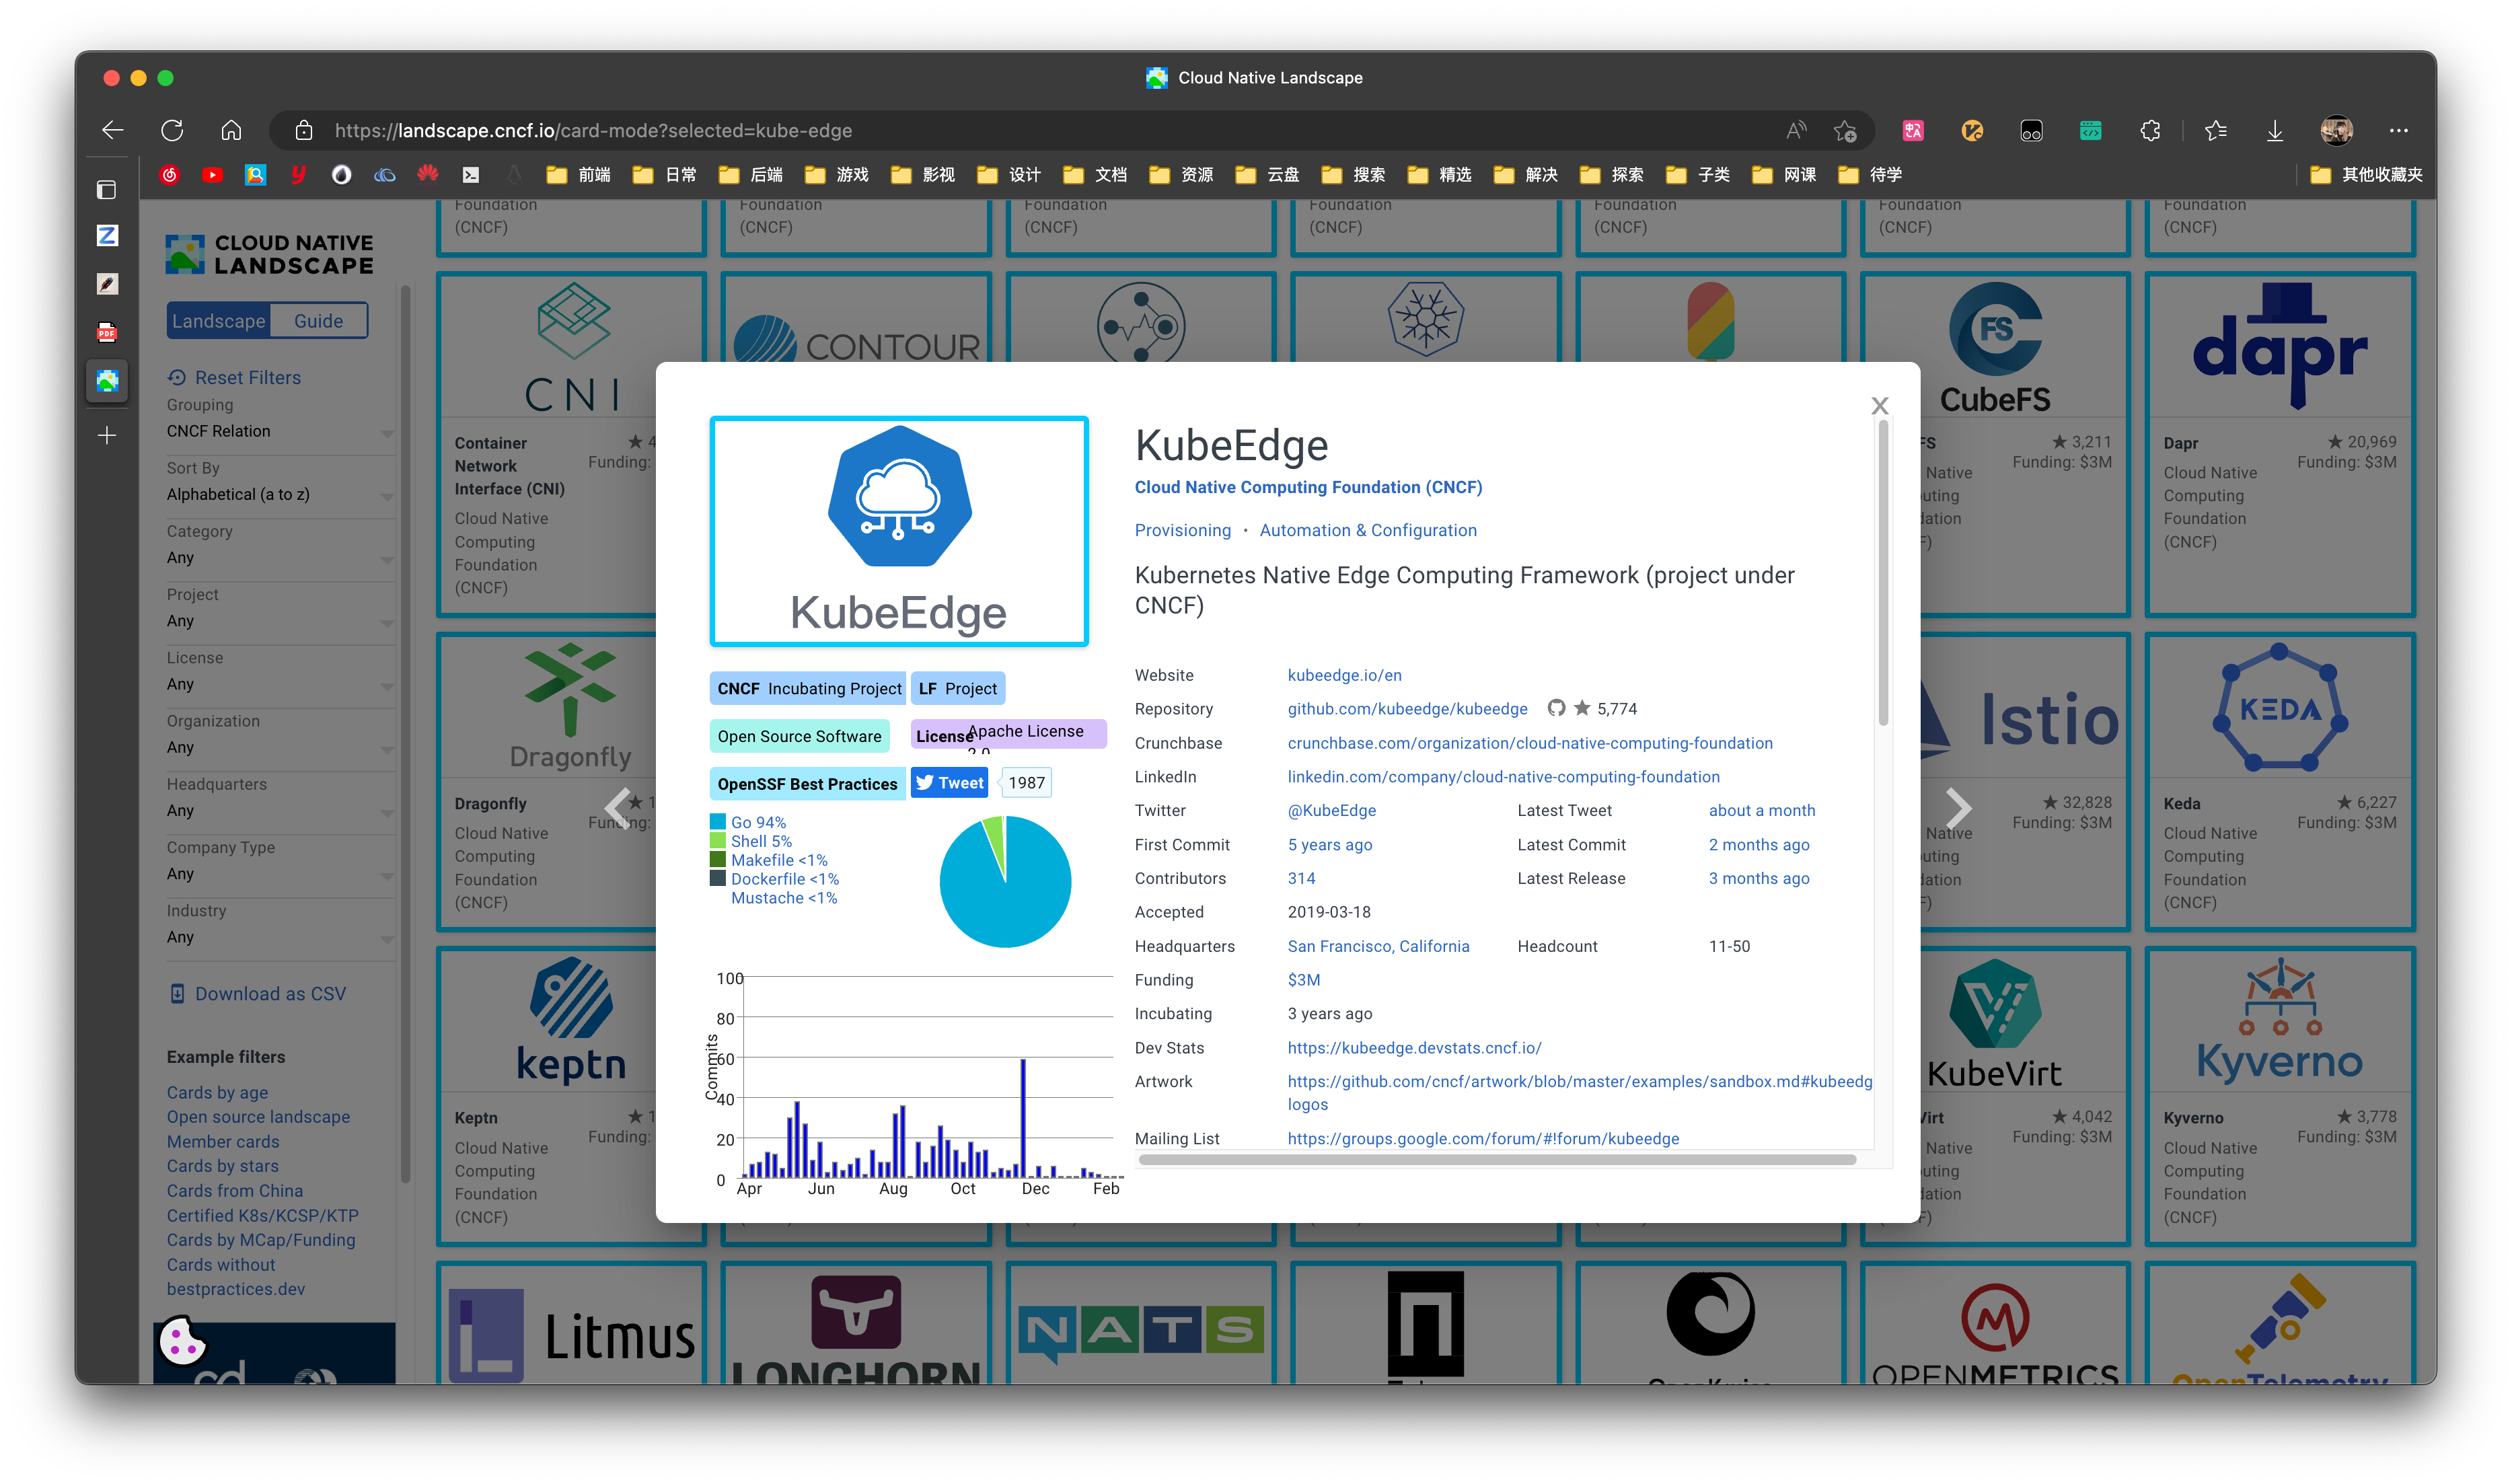
生态
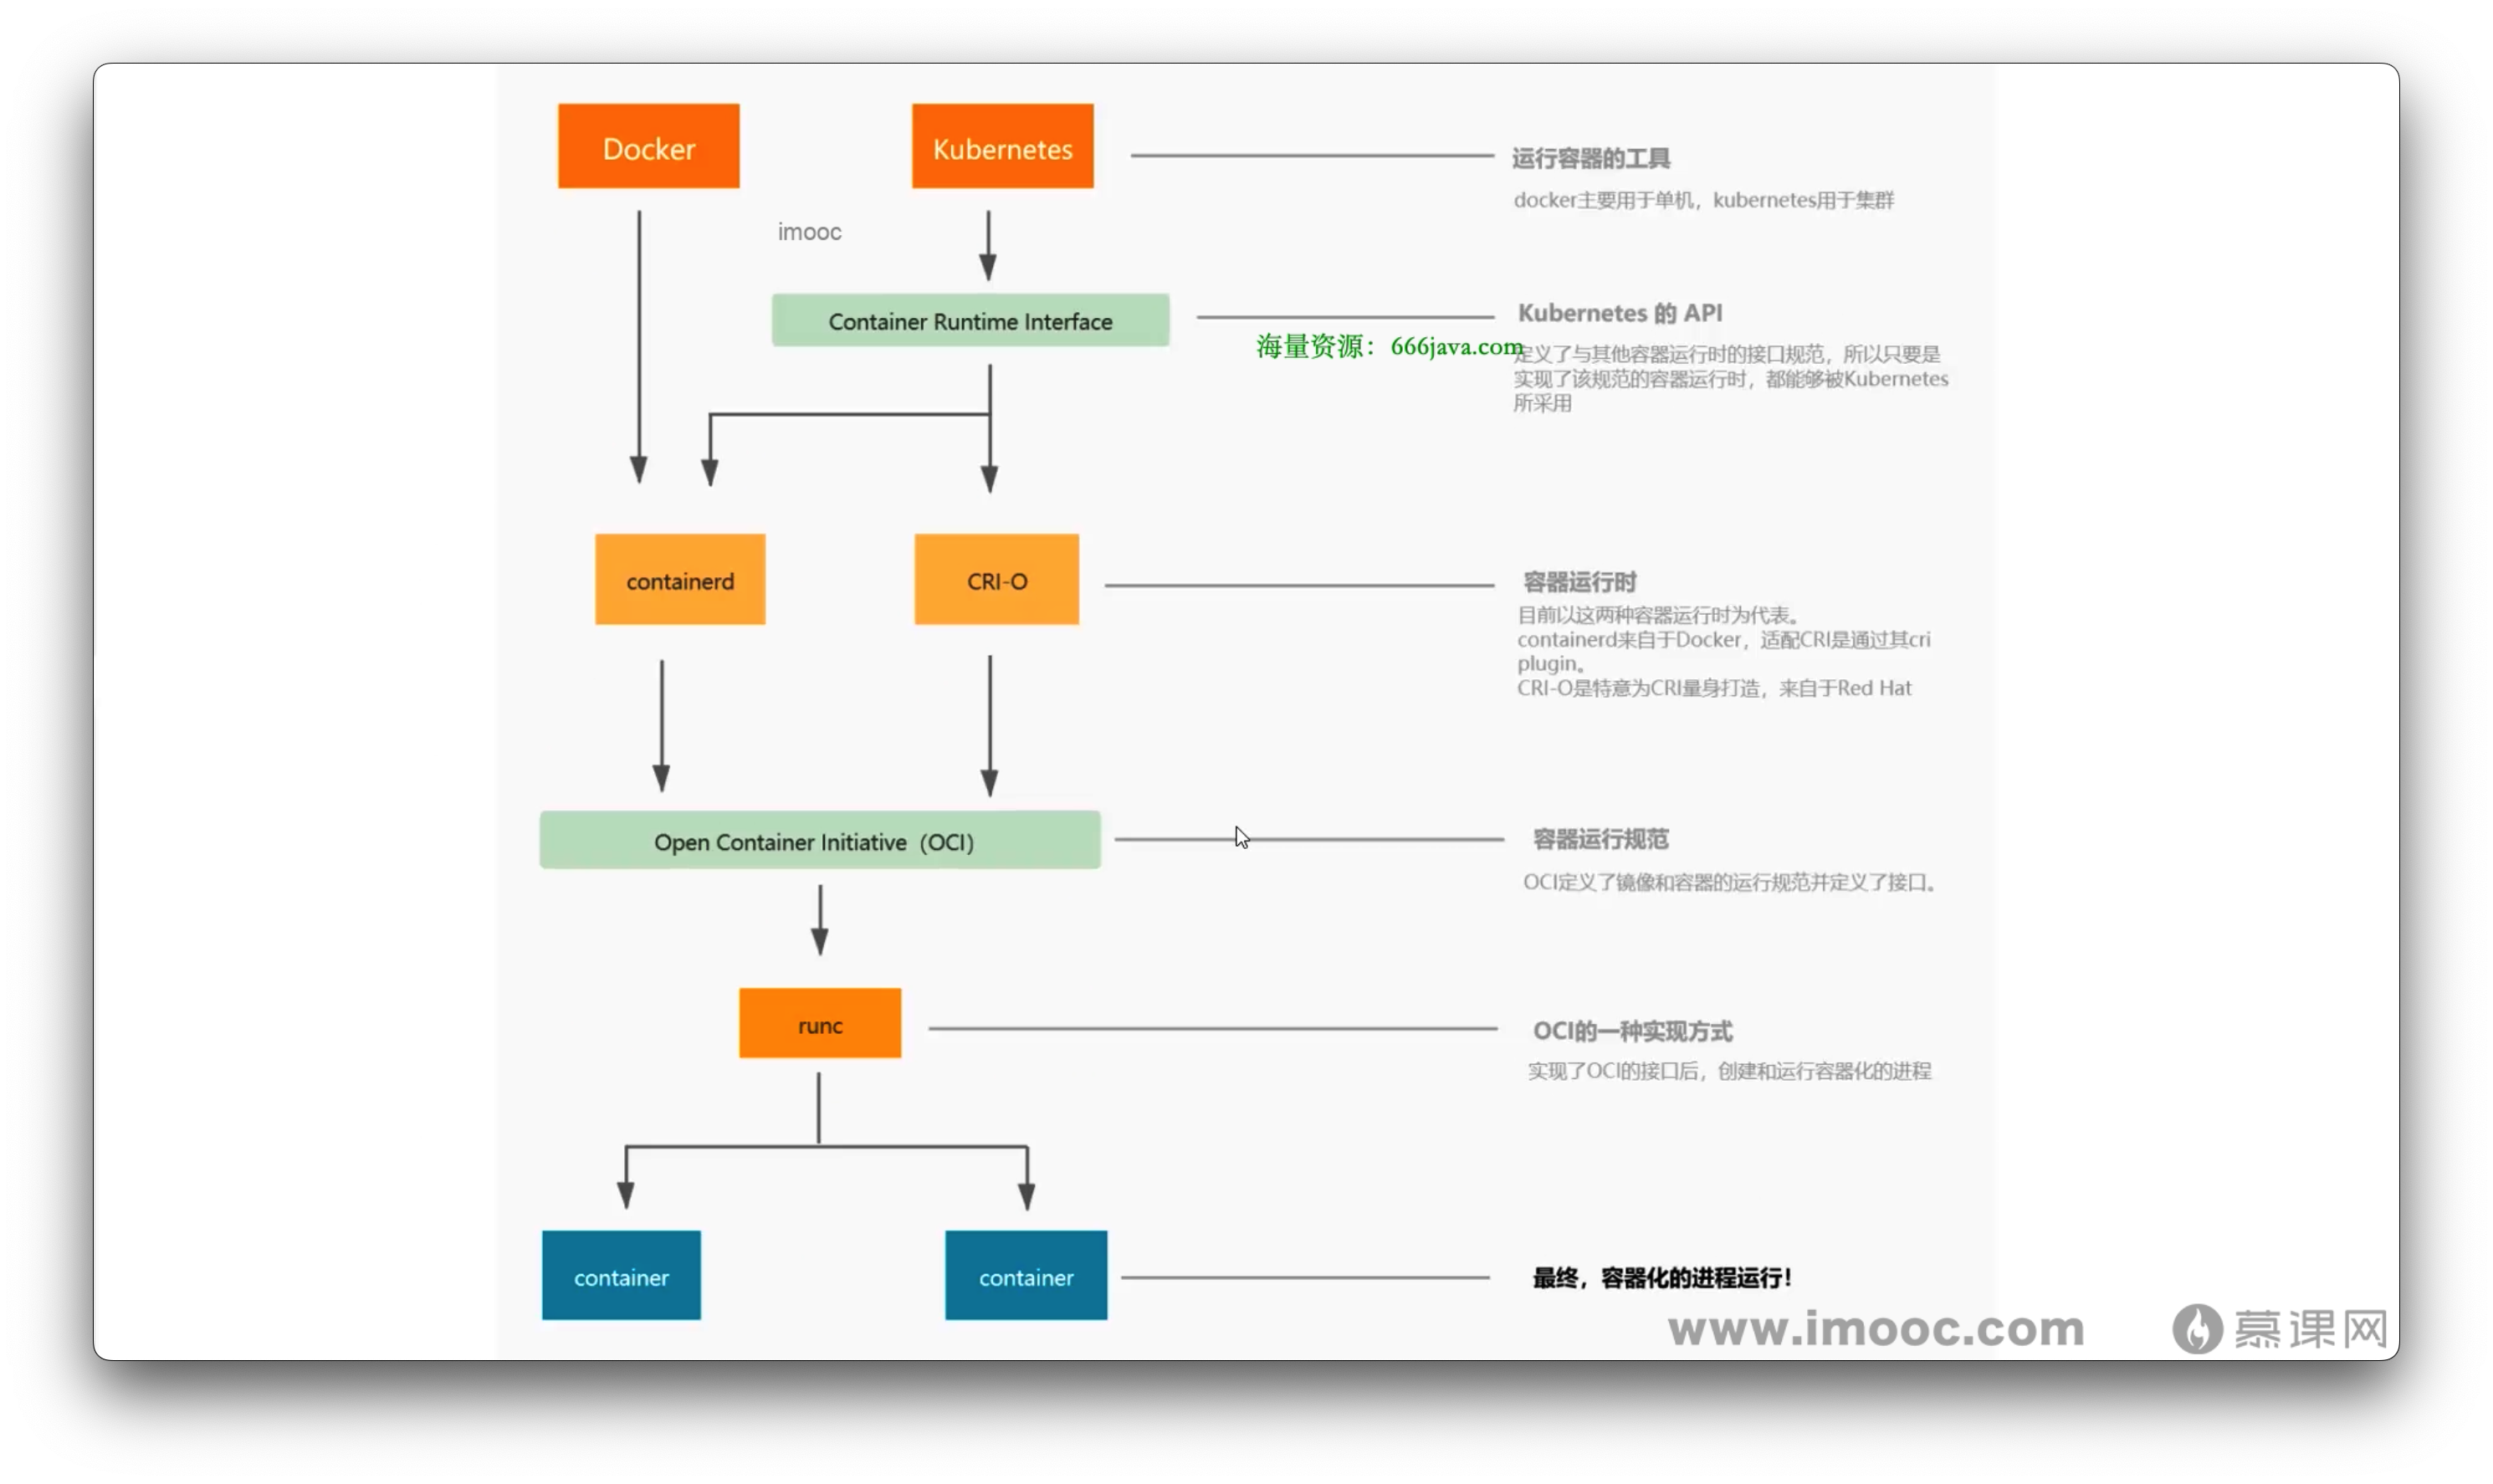
容器 容器调用链路
主流容器技术之间的联系
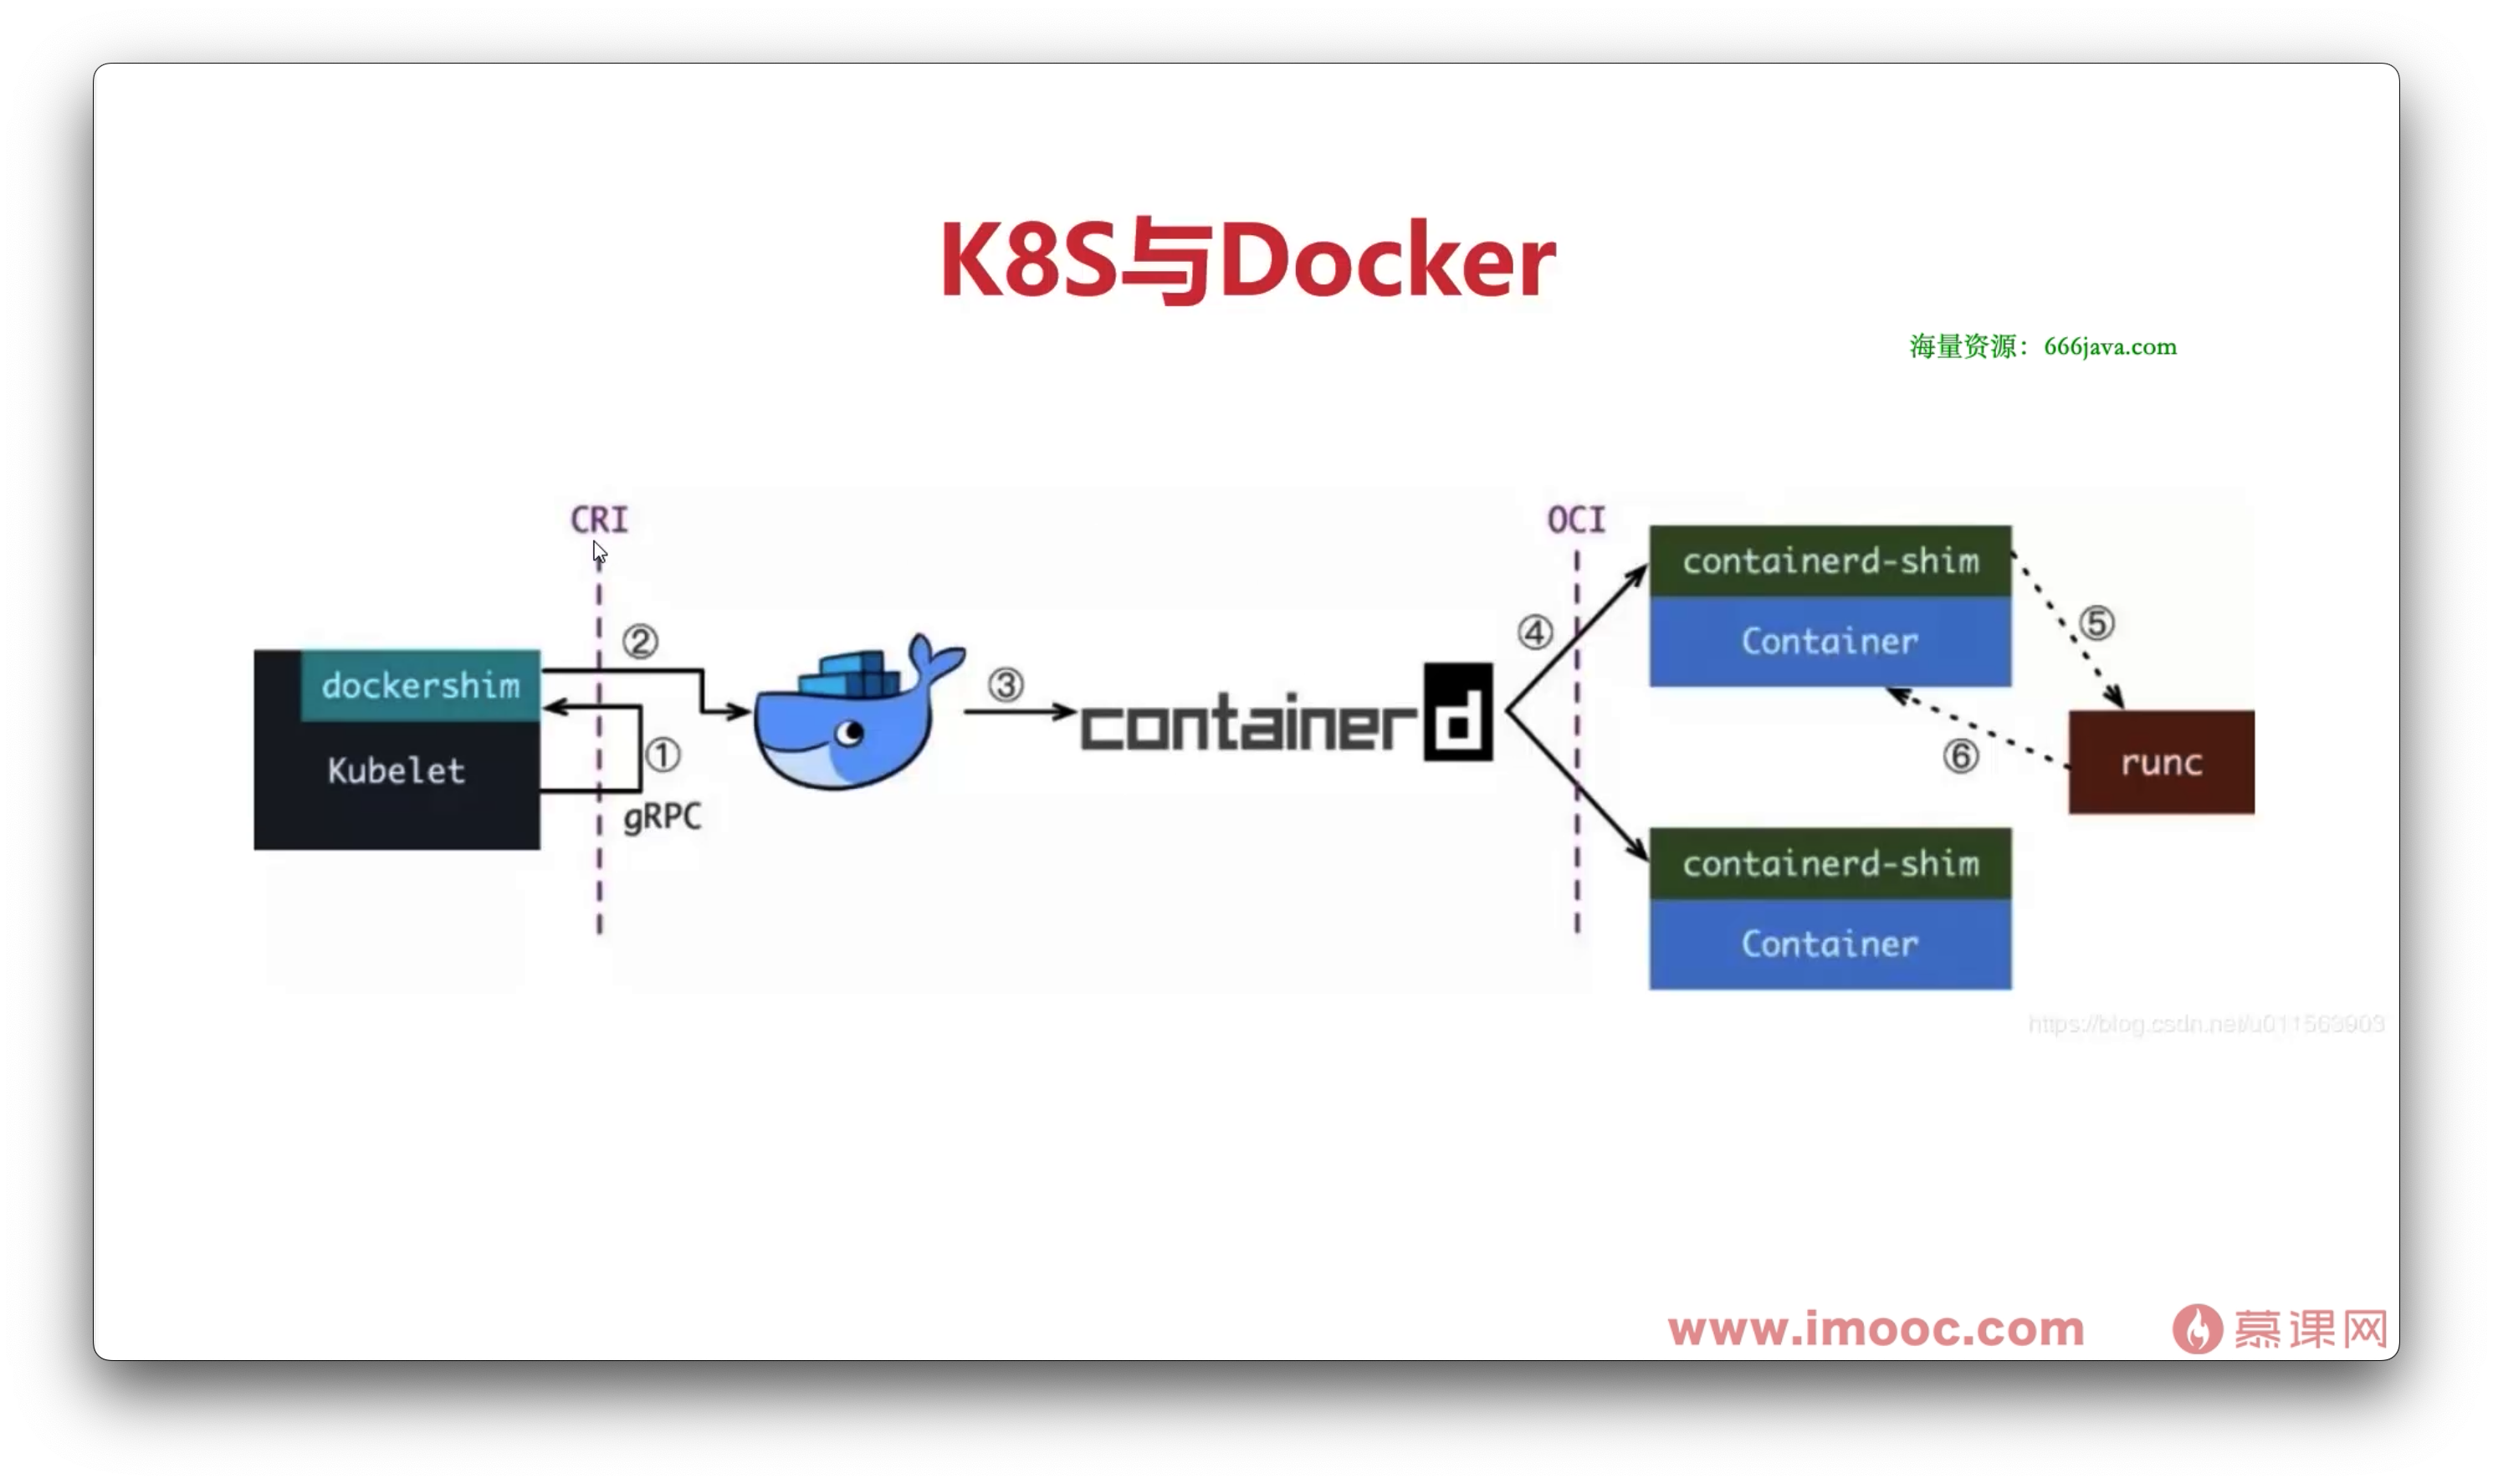
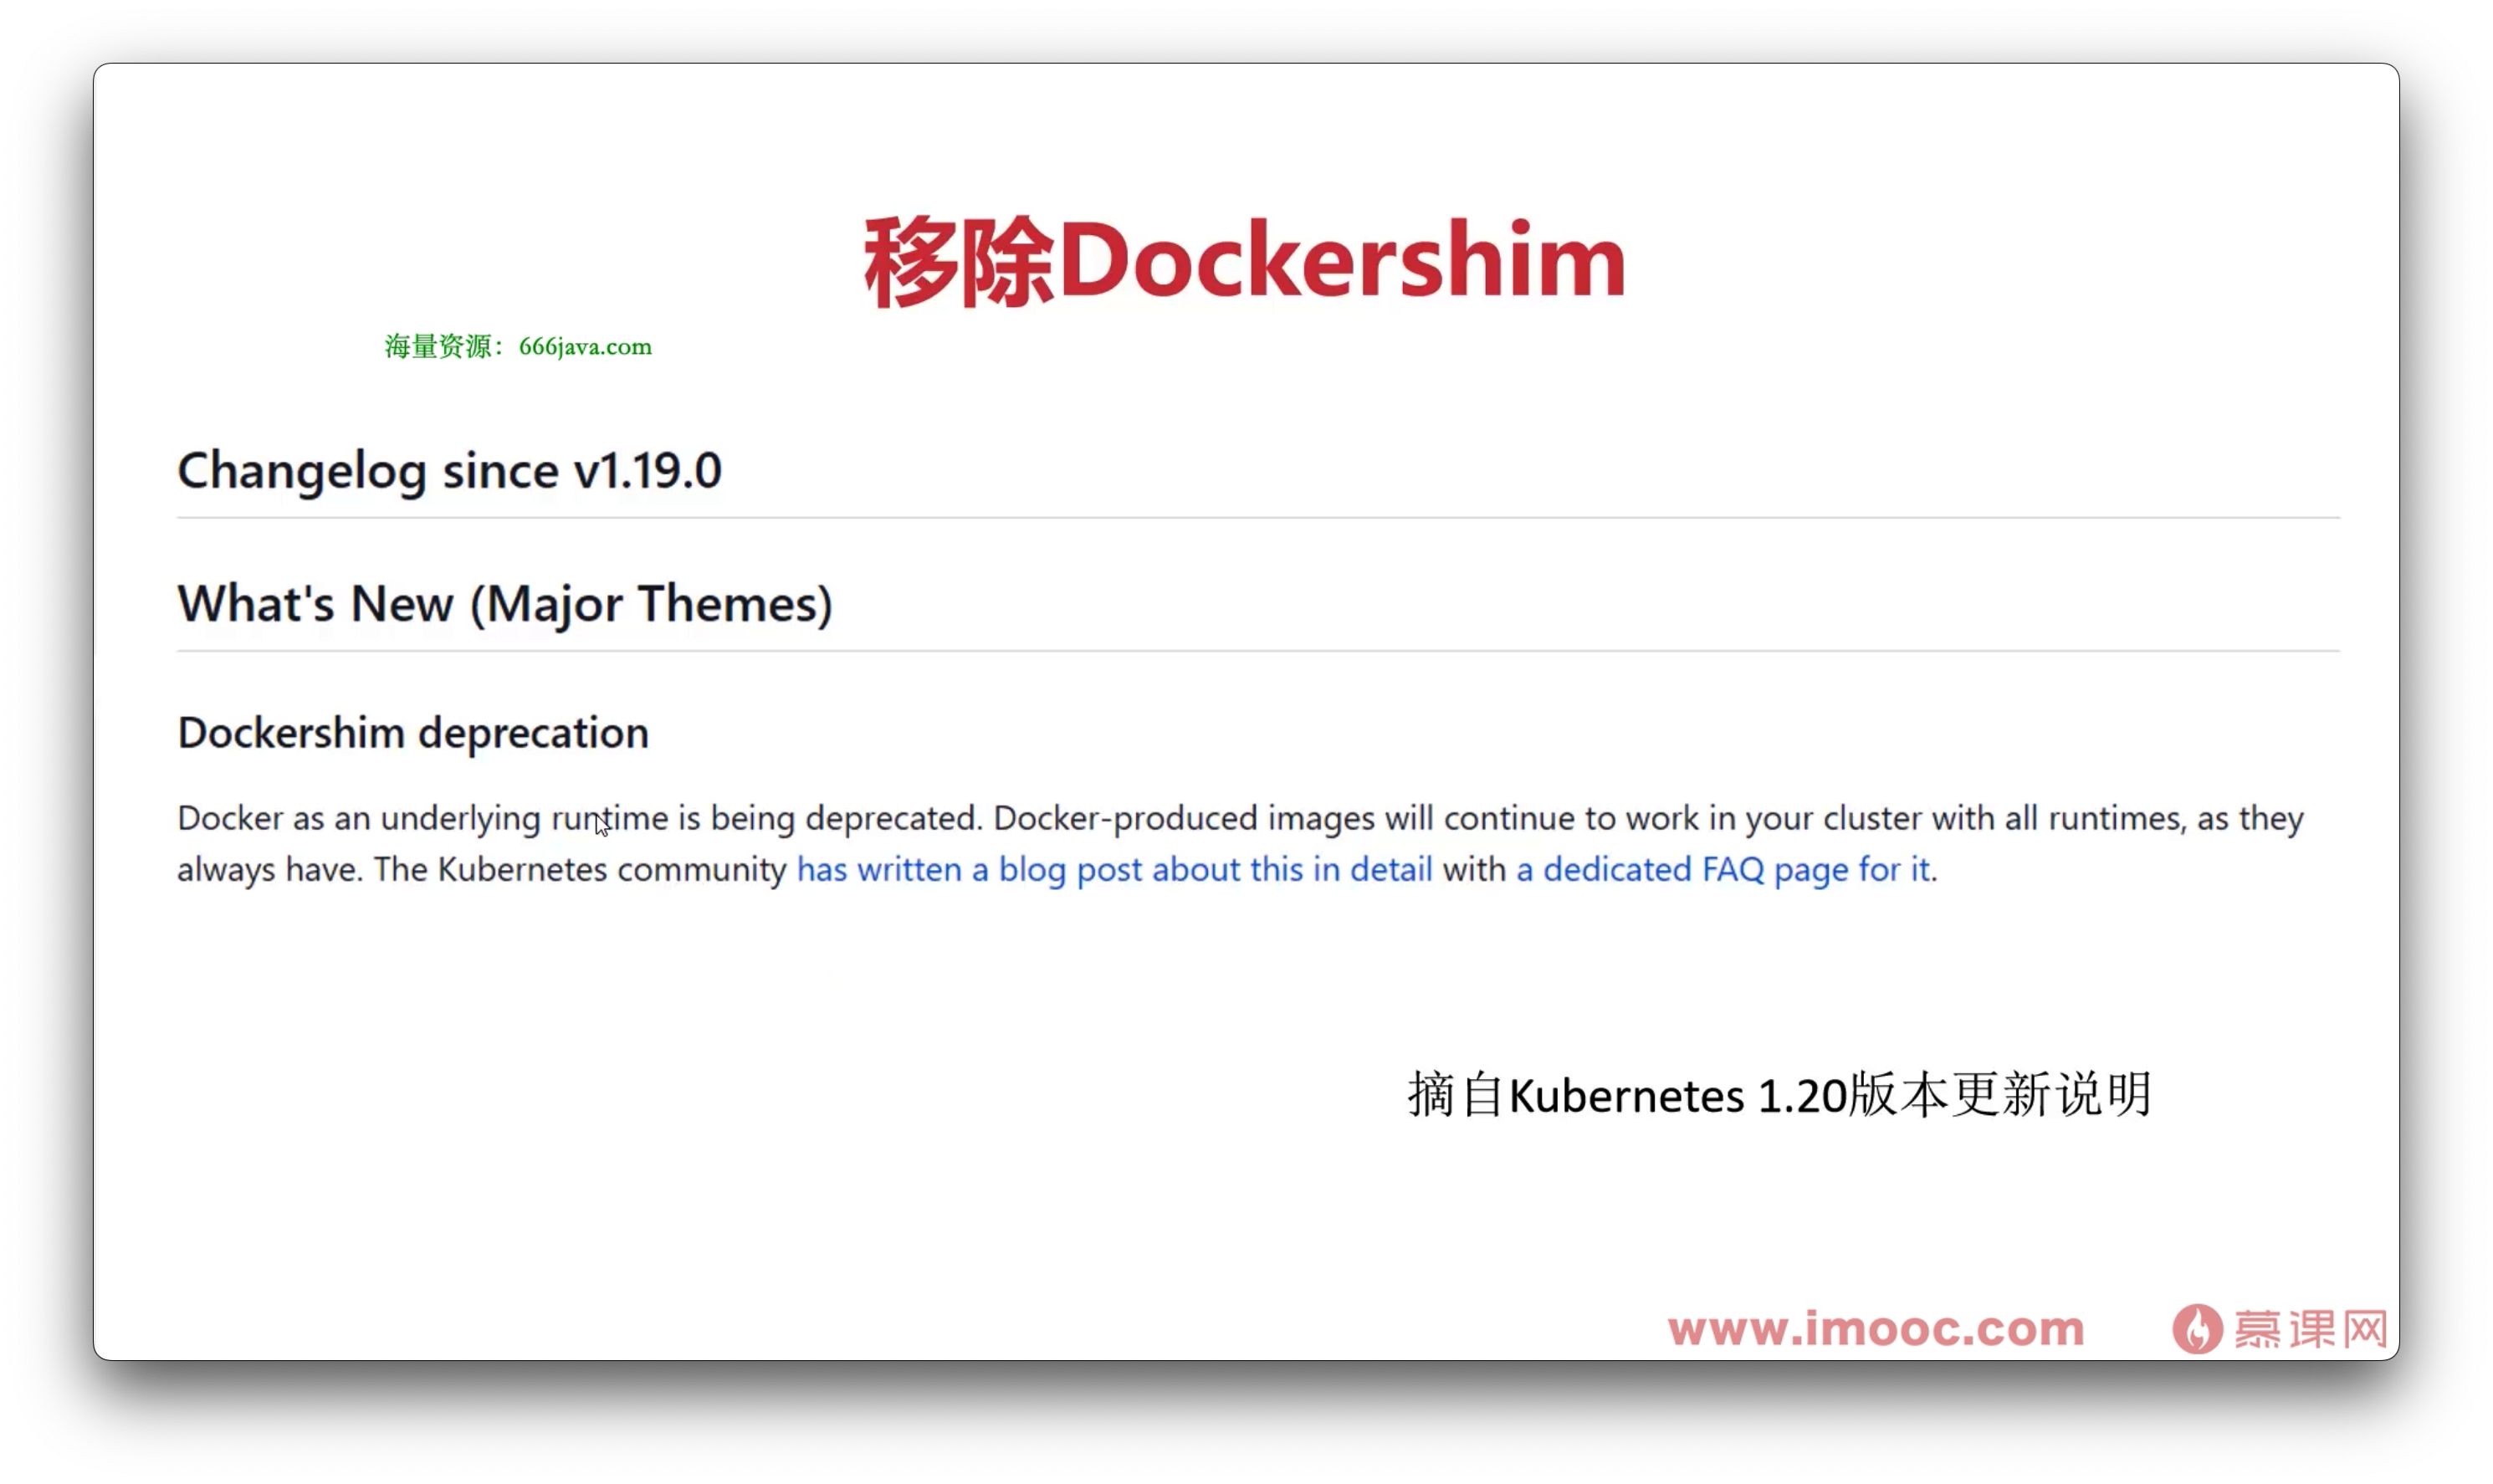
为什么要移除 Dockershim 呢?
不可变基础设施
声明式API
声明式API实战演练 单机部署: docker-compose
1
2
3
4
5
6
7
8
9
10
11
12
13
14
15
16
17
18
19
$ apt install docker-compose -y"2" "8081:80" "8082:80"
多机部署: Kubernetes
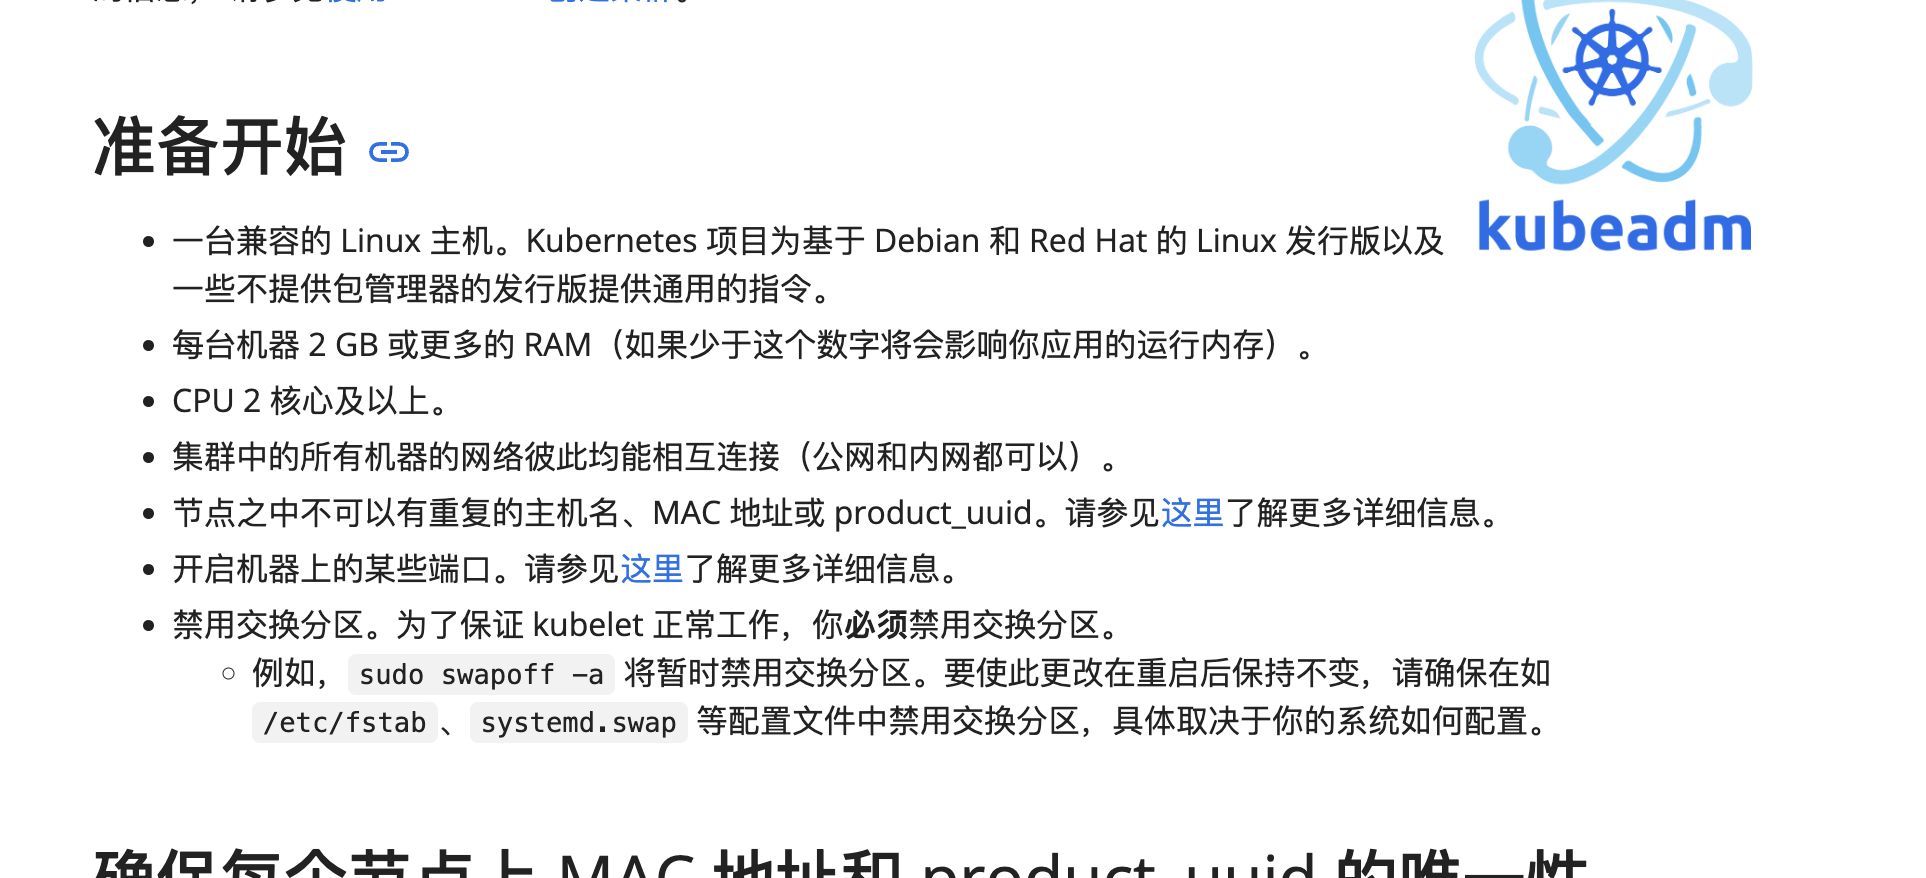
安装步骤
1
2
3
4
5
6
7
8
9
10
11
Master 节点
实验机器上面默认没有防火墙 所以将其注释了 如果需要手动取消注释即可
1
2
3
4
5
6
7
8
9
10
11
12
13
14
15
16
17
18
19
20
21
22
23
24
25
26
27
28
29
30
31
32
33
34
35
36
37
38
39
40
41
42
43
44
45
46
47
48
49
50
51
52
53
54
55
56
57
58
59
60
61
62
63
64
65
66
67
68
69
70
71
72
73
74
75
76
77
78
79
80
81
82
83
84
85
86
87
88
89
90
91
92
93
94
95
96
97
98
99
100
101
102
103
104
105
106
107
108
109
110
111
112
113
114
115
116
117
118
119
120
121
122
123
124
125
126
127
128
129
130
131
132
133
134
135
136
137
138
139
140
141
142
143
144
145
146
147
148
149
150
151
152
153
154
155
156
157
158
159
160
161
162
163
164
165
166
167
168
169
170
171
172
173
174
175
176
177
178
179
180
181
182
183
184
185
#!/bin/bash set -elog date +'%Y%m%d %T' )"\x1b[0;32m" "\x1b[0m" function info echo -e "${COLOR_G} [$tm ] [Info] ${1} ${RESET} " function run_cmd "$1 | $(tee -a "$install_log " ) " function run_function $1 | tee -a "$install_log " function install_docker "1.使用脚本自动安装docker..." "2.启动 Docker CE..." sudo systemctl enable dockersudo systemctl start docker"3.添加镜像加速器..." if [ ! -f "/etc/docker/daemon.json" ];then touch /etc/docker/daemon.jsonfi cat <<EOF > /etc/docker/daemon.json { "registry-mirrors": [ "https://5ajk0rns.mirror.aliyuncs.com" ] } EOF "4.重新启动服务..." sudo systemctl daemon-reloadsudo systemctl restart docker"5.测试 Docker 是否安装正确..." "6.检测..." read -p "是否安装docker-compose?默认为 no. Enter [yes/no]:" is_composeif [[ "$is_compose " == 'yes' ]];then "7.安装docker-compose" sudo curl -L "https://github.com/docker/compose/releases/download/1.27.4/docker-compose-$(uname -s) -$(uname -m) " -o /usr/local/bin/docker-composesudo chmod a+x /usr/local/bin/docker-compose"8.验证docker-compose是否安装成功..." fi function install_k8s "初始化k8s部署环境..." "添加k8s安装源..." "安装kubelet kubeadmin kubectl..." "安装kubernetes master..." if [[ ! "$(ps aux | grep 'kubernetes' | grep -v 'grep') " ]];then else "kubernetes master已经安装..." fi "安装网络插件flannel..." "去污点..." function init_env "关闭防火墙" "关闭selinux" 's/^SELINUX=enforcing$/SELINUX=disabled/g' /etc/selinux/configsource /etc/selinux/config"关闭swap(k8s禁止虚拟内存以提高性能)" '/swap/s/^\(.*\)$/#\1/g' /etc/fstab"设置网桥参数" cat <<-EOF > /etc/sysctl.d/k8s.conf net.bridge.bridge-nf-call-ip6tables = 1 net.bridge.bridge-nf-call-iptables = 1 EOF "时间同步" function add_aliyun_repo cat > /etc/yum.repos.d/kubernetes.repo <<- EOF [kubernetes] name=Kubernetes baseurl=https://mirrors.aliyun.com/kubernetes/yum/repos/kubernetes-el7-x86_64 enabled=1 gpgcheck=0 repo_gpgcheck=0 gpgkey=https://mirrors.aliyun.com/kubernetes/yum/doc/yum-key.gpg https://mirrors.aliyun.com/kubernetes/yum/doc/rpm-package-key.gpg EOF function install_kubelet_kubeadmin_kubectl enable kubelet.service"确认kubelet kubeadmin kubectl是否安装成功" function kubeadmin_init sleep 1read -p "请输入master ip地址:" ip"${ip} " --image-repository registry.aliyuncs.com/google_containers --kubernetes-version v1.19.4 --service-cidr=10.96.0.0/12 --pod-network-cidr=10.244.0.0/16mkdir -p "$HOME " /.kubesudo cp -i /etc/kubernetes/admin.conf "$HOME " /.kube/configsudo chown "$(id -u) " :"$(id -g) " "$HOME " /.kube/configfunction install_flannel read -p "是否安装docker?默认为:no. Enter [yes/no]:" is_dockerif [[ "$is_docker " == 'yes' ]];then "install_docker" fi read -p "是否安装k8s?默认为:no. Enter [yes/no]:" is_k8sif [[ "$is_k8s " == 'yes' ]];then "install_k8s" fi
1
2
3
4
5
6
7
8
9
10
11
12
13
[root@kubeedge-k8s ~]# kubectl get pod -A
Node 节点
加入集群的命令在 /var/log/install_k8s.log
1
2
3
4
5
6
7
8
9
10
11
12
13
14
15
16
17
18
19
20
21
22
23
24
25
26
27
28
29
30
31
32
33
34
35
36
37
38
39
40
41
42
43
44
45
46
47
48
49
50
51
52
53
54
55
56
57
58
59
60
61
62
63
64
65
66
67
68
69
70
71
72
73
74
75
76
77
78
79
80
81
82
83
84
85
86
87
88
89
90
91
92
93
94
95
96
97
98
99
100
101
102
103
104
105
106
107
108
109
110
111
112
113
114
115
116
117
118
119
120
121
122
123
124
125
126
127
128
129
130
131
132
133
134
135
136
137
138
139
140
141
142
143
144
145
146
147
148
149
150
151
152
153
154
155
156
157
158
159
160
161
162
163
164
165
166
167
168
169
170
171
172
173
174
175
176
177
178
179
180
181
182
183
184
185
186
187
188
189
190
191
192
193
194
195
196
197
198
199
#!/bin/bash set -elog date +'%Y%m%d %T' )"\x1b[0;32m" "\x1b[0m" function info echo -e "${COLOR_G} [$tm ] [Info] ${1} ${RESET} " function run_cmd "$1 | $(tee -a "$install_log " ) " function run_function $1 | tee -a "$install_log " function install_docker "1.使用脚本安装docker..." "2.启动 Docker CE..." sudo systemctl enable dockersudo systemctl start docker"3.添加镜像加速器..." if [ ! -f "/etc/docker/daemon.json" ];then touch /etc/docker/daemon.jsonfi cat <<EOF > /etc/docker/daemon.json { "exec-opts": ["native.cgroupdriver=systemd"], "registry-mirrors": ["https://4txtc8r4.mirror.aliyuncs.com"] } EOF "4.重新启动服务..." sudo systemctl daemon-reloadsudo systemctl restart docker"5.测试 Docker 是否安装正确..." "6.检测..." read -p "是否安装docker-compose?默认为 no. Enter [yes/no]:" is_composeif [[ "$is_compose " == 'yes' ]];then "7.安装docker-compose" sudo curl -L "https://github.com/docker/compose/releases/download/1.27.4/docker-compose-$(uname -s) -$(uname -m) " -o /usr/local/bin/docker-composesudo chmod a+x /usr/local/bin/docker-composeif [ -f "/usr/bin/docker-compose" ];then sudo rm -f /usr/bin/docker-composefi sudo ln -s /usr/local/bin/docker-compose /usr/bin/docker-compose "8.验证docker-compose是否安装成功..." fi function install_k8s "初始化k8s部署环境..." "添加k8s安装源..." "安装kubelet kubeadmin kubectl..." "加入集群kubernetes..." if [[ ! "$(ps aux | grep 'kubernetes' | grep -v 'grep') " ]];then else "已加入集群kubernetes..." fi "安装网络插件flannel..." function init_env "关闭防火墙" "关闭selinux" 's/^SELINUX=enforcing$/SELINUX=disabled/g' /etc/selinux/configsource /etc/selinux/config"关闭swap(k8s禁止虚拟内存以提高性能)" '/swap/s/^\(.*\)$/#\1/g' /etc/fstab"设置网桥参数" cat <<-EOF > /etc/sysctl.d/k8s.conf net.bridge.bridge-nf-call-ip6tables = 1 net.bridge.bridge-nf-call-iptables = 1 EOF "时间同步" function add_aliyun_repo cat > /etc/yum.repos.d/kubernetes.repo <<- EOF [kubernetes] name=Kubernetes baseurl=https://mirrors.aliyun.com/kubernetes/yum/repos/kubernetes-el7-x86_64 enabled=1 gpgcheck=0 repo_gpgcheck=0 gpgkey=https://mirrors.aliyun.com/kubernetes/yum/doc/yum-key.gpg https://mirrors.aliyun.com/kubernetes/yum/doc/rpm-package-key.gpg EOF function install_kubelet_kubeadmin_kubectl enable kubelet.service"确认kubelet kubeadmin kubectl是否安装成功" function kubeadmin_init sleep 1read -p "请输入master ip地址:" ipmkdir -p "$HOME " /.kubesudo scp -r root@"${ip} " :/etc/kubernetes/admin.conf "$HOME " /.kube/configsudo chown "$(id -u) " :"$(id -g) " "$HOME " /.kube/configif [ ! -f "/home/centos/.kube/config" ];then sudo cp -r "$HOME " /.kube /home/centossudo chown -R centos:centos /home/centos/.kubefi read -p "把工作节点加入集群,请手动输入命令:" icsudo sh -c "${ic} " function install_flannel if [ ! -f "./kube-flannel.yml" ];then fi read -p "是否安装docker?默认为:no. Enter [yes/no]:" is_dockerif [[ "$is_docker " == 'yes' ]];then "install_docker" fi read -p "是否安装k8s?默认为:no. Enter [yes/no]:" is_k8sif [[ "$is_k8s " == 'yes' ]];then "install_k8s" fi
1
2
3
4
5
6
7
8
9
10
11
12
13
14
15
16
[root@kubeedge-k8s-node ~]# kubectl get pod -A
1
2
3
4
5
6
7
8
9
10
11
12
13
14
15
16
17
18
19
20
21
22
23
24
25
26
27
28
29
30
31
32
33
34
$ kubeadm version"1" , Minor:"19" , GitVersion:"v1.19.4" , GitCommit:"d360454c9bcd1634cf4cc52d1867af5491dc9c5f" , GitTreeState:"clean" , BuildDate:"2020-11-11T13:15:05Z" , GoVersion:"go1.15.2" , Compiler:"gc" , Platform:"linux/amd64" }"1" , Minor:"19" , GitVersion:"v1.19.4" , GitCommit:"d360454c9bcd1634cf4cc52d1867af5491dc9c5f" , GitTreeState:"clean" , BuildDate:"2020-11-11T13:17:17Z" , GoVersion:"go1.15.2" , Compiler:"gc" , Platform:"linux/amd64" }"1" , Minor:"19" , GitVersion:"v1.19.4" , GitCommit:"d360454c9bcd1634cf4cc52d1867af5491dc9c5f" , GitTreeState:"clean" , BuildDate:"2020-11-11T13:09:17Z" , GoVersion:"go1.15.2" , Compiler:"gc" , Platform:"linux/amd64" }"cniVersion" :"0.3.1" , "hairpinMode" :true ..."cniVersion" :"0.3.1" ,"hairpinMode" :true ,"ipMasq" :false ,"ipa...ge" }"cniVersion" :"0.3.1" , "hairpinMode" :true ...in full.
1
2
3
4
5
6
7
8
9
10
11
12
13
14
15
16
17
18
19
20
21
22
23
24
25
26
27
28
29
30
31
32
33
34
35
36
37
$ vim nginx-deployment.yamltrue
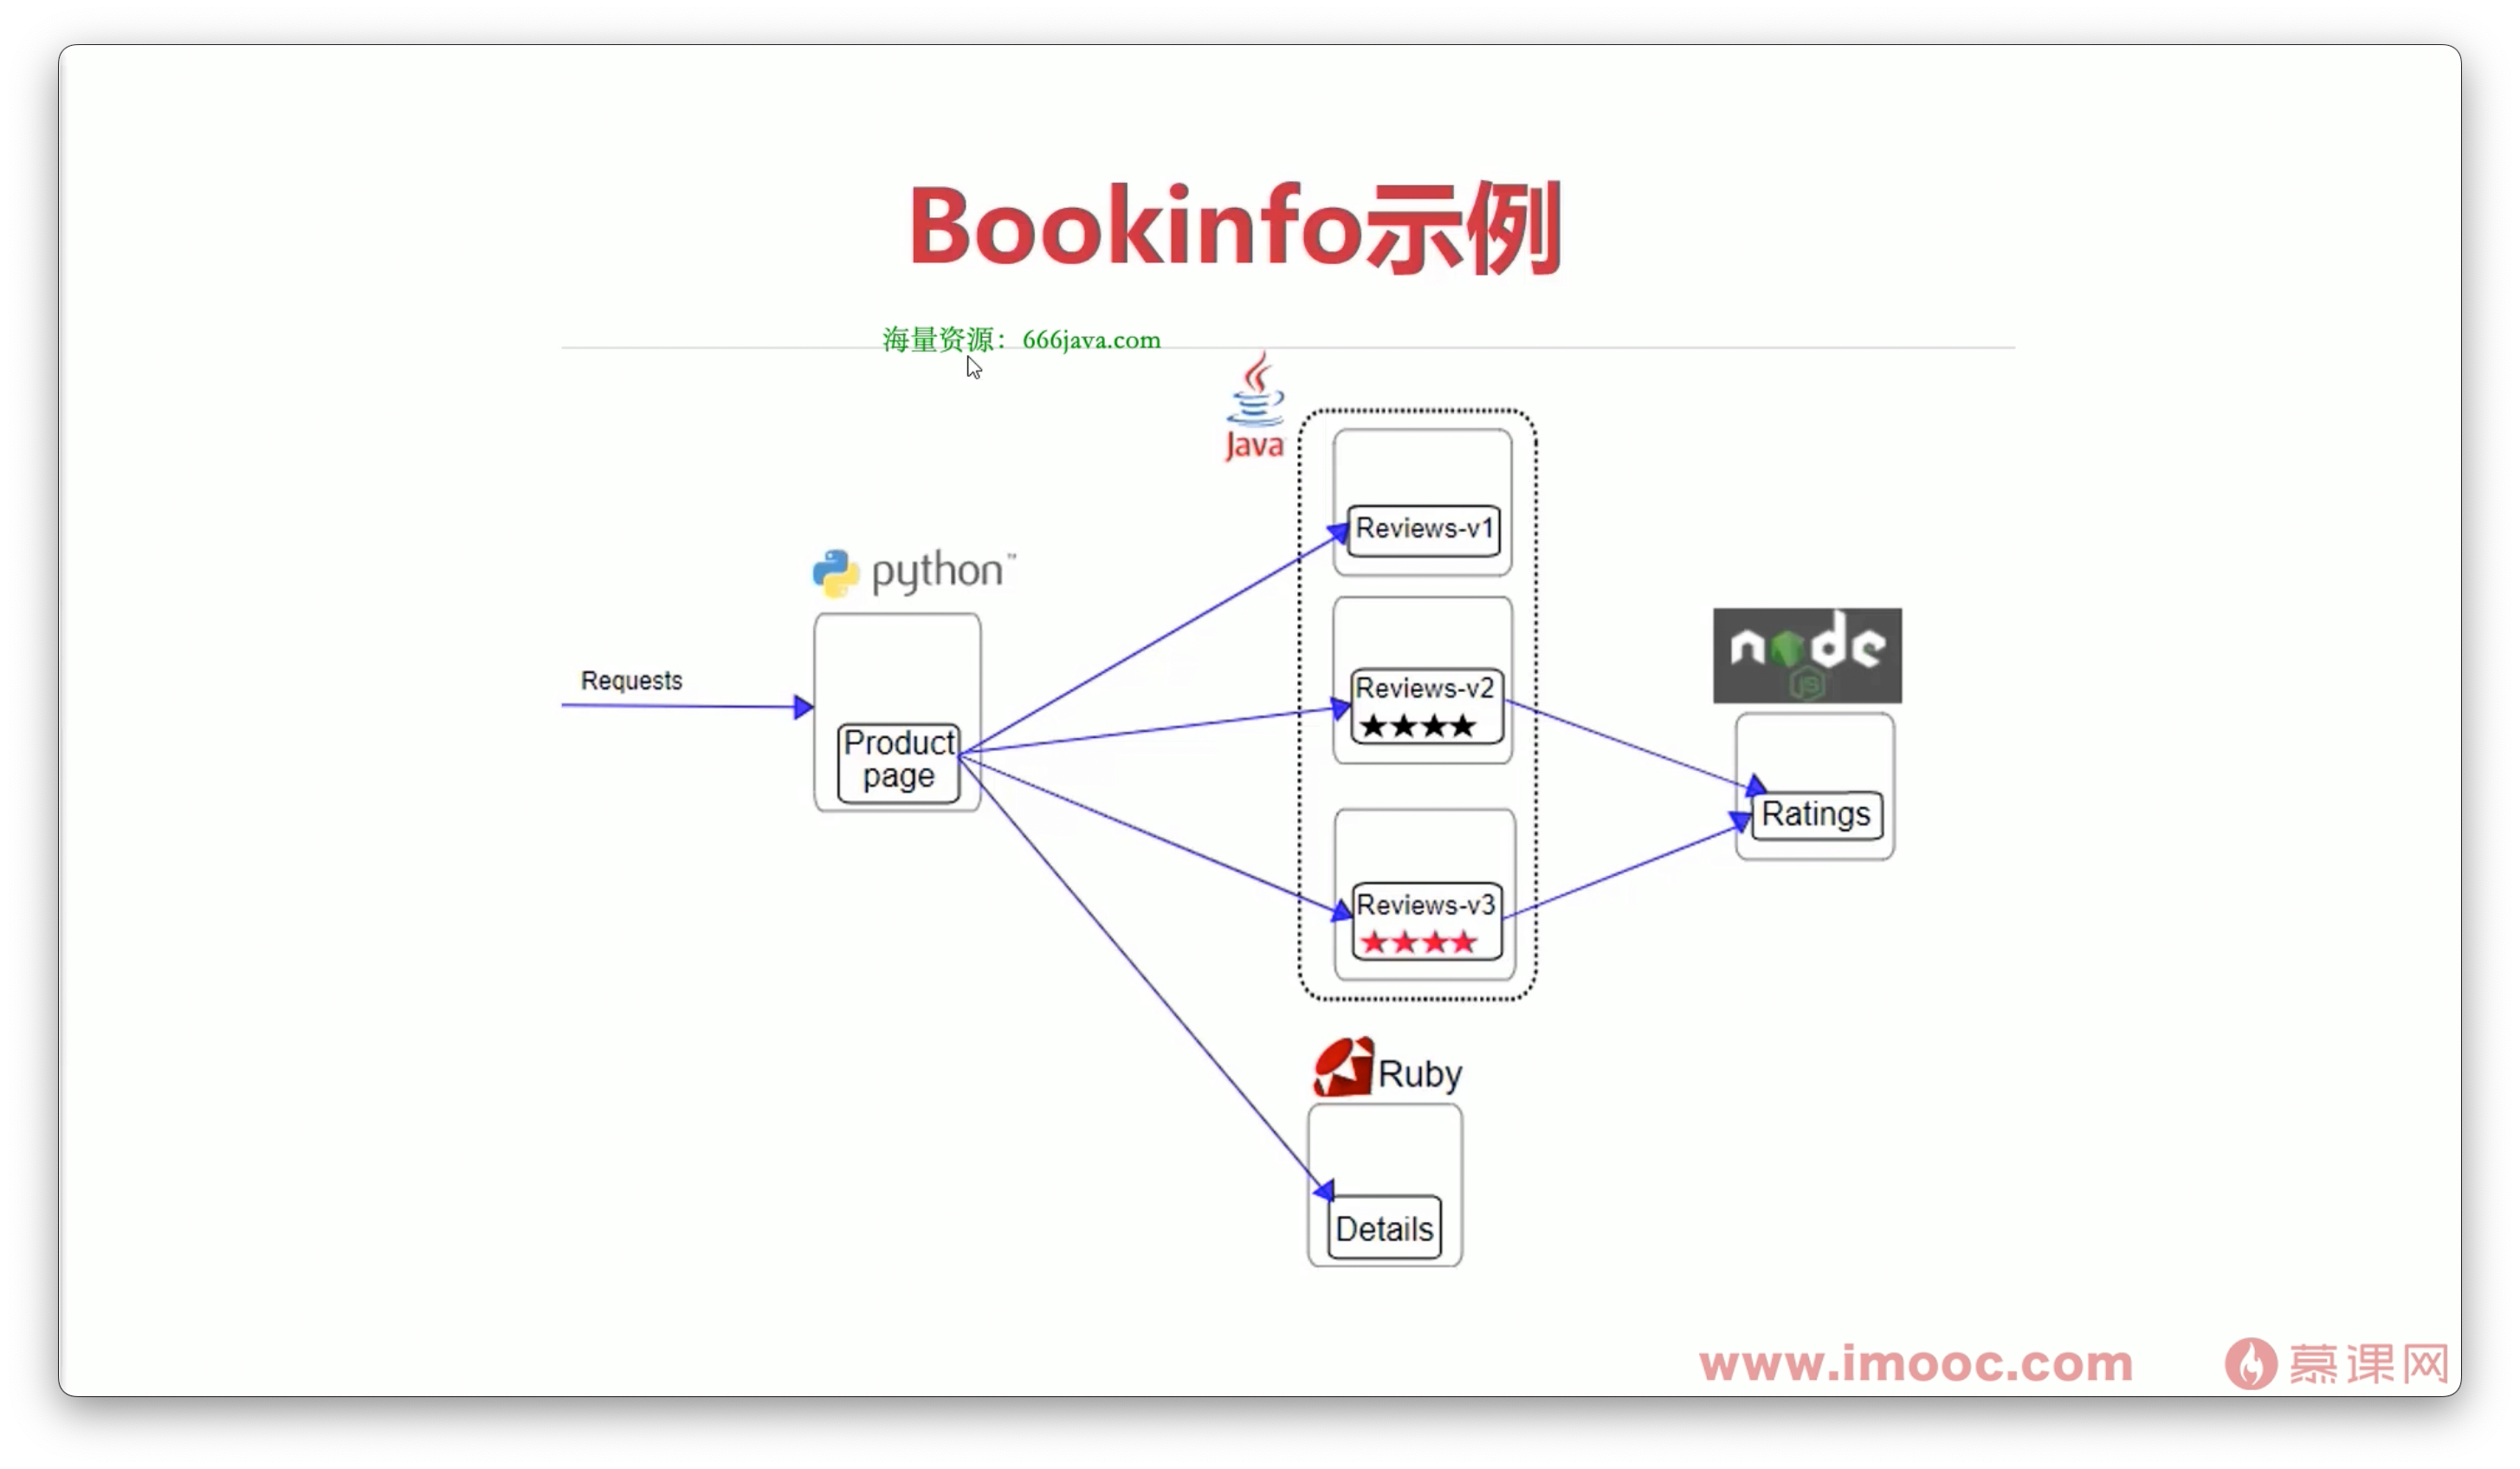
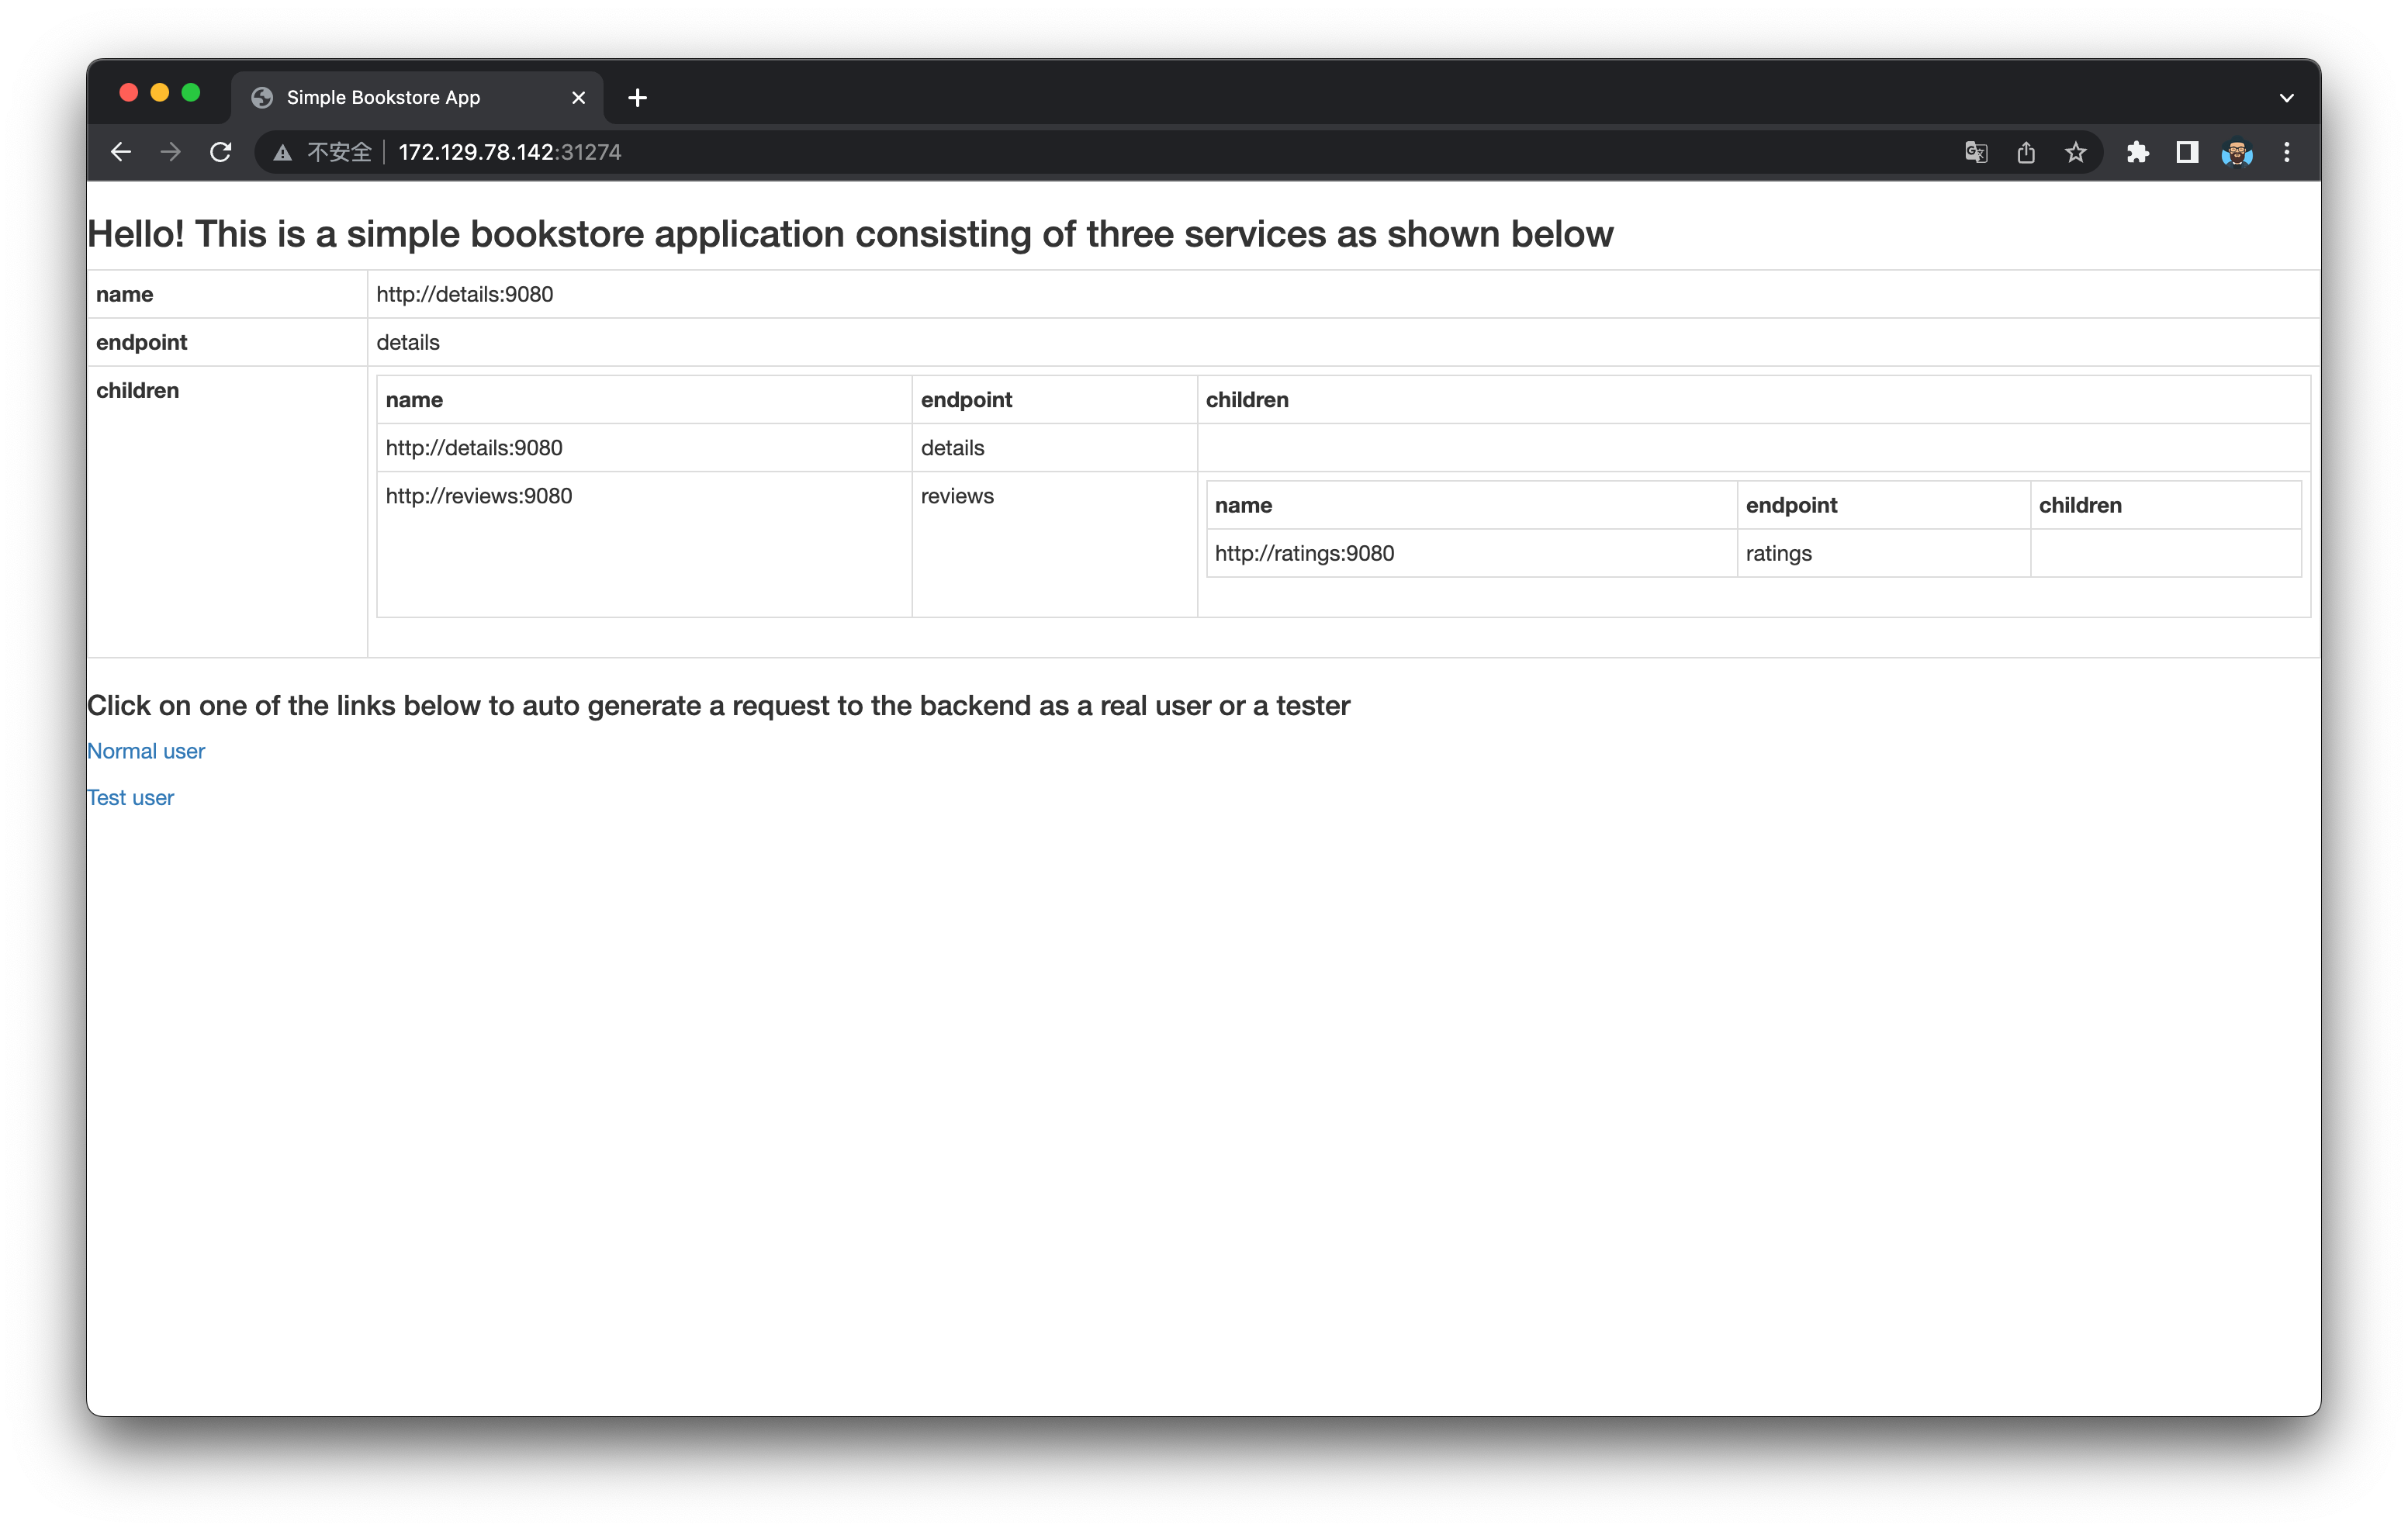
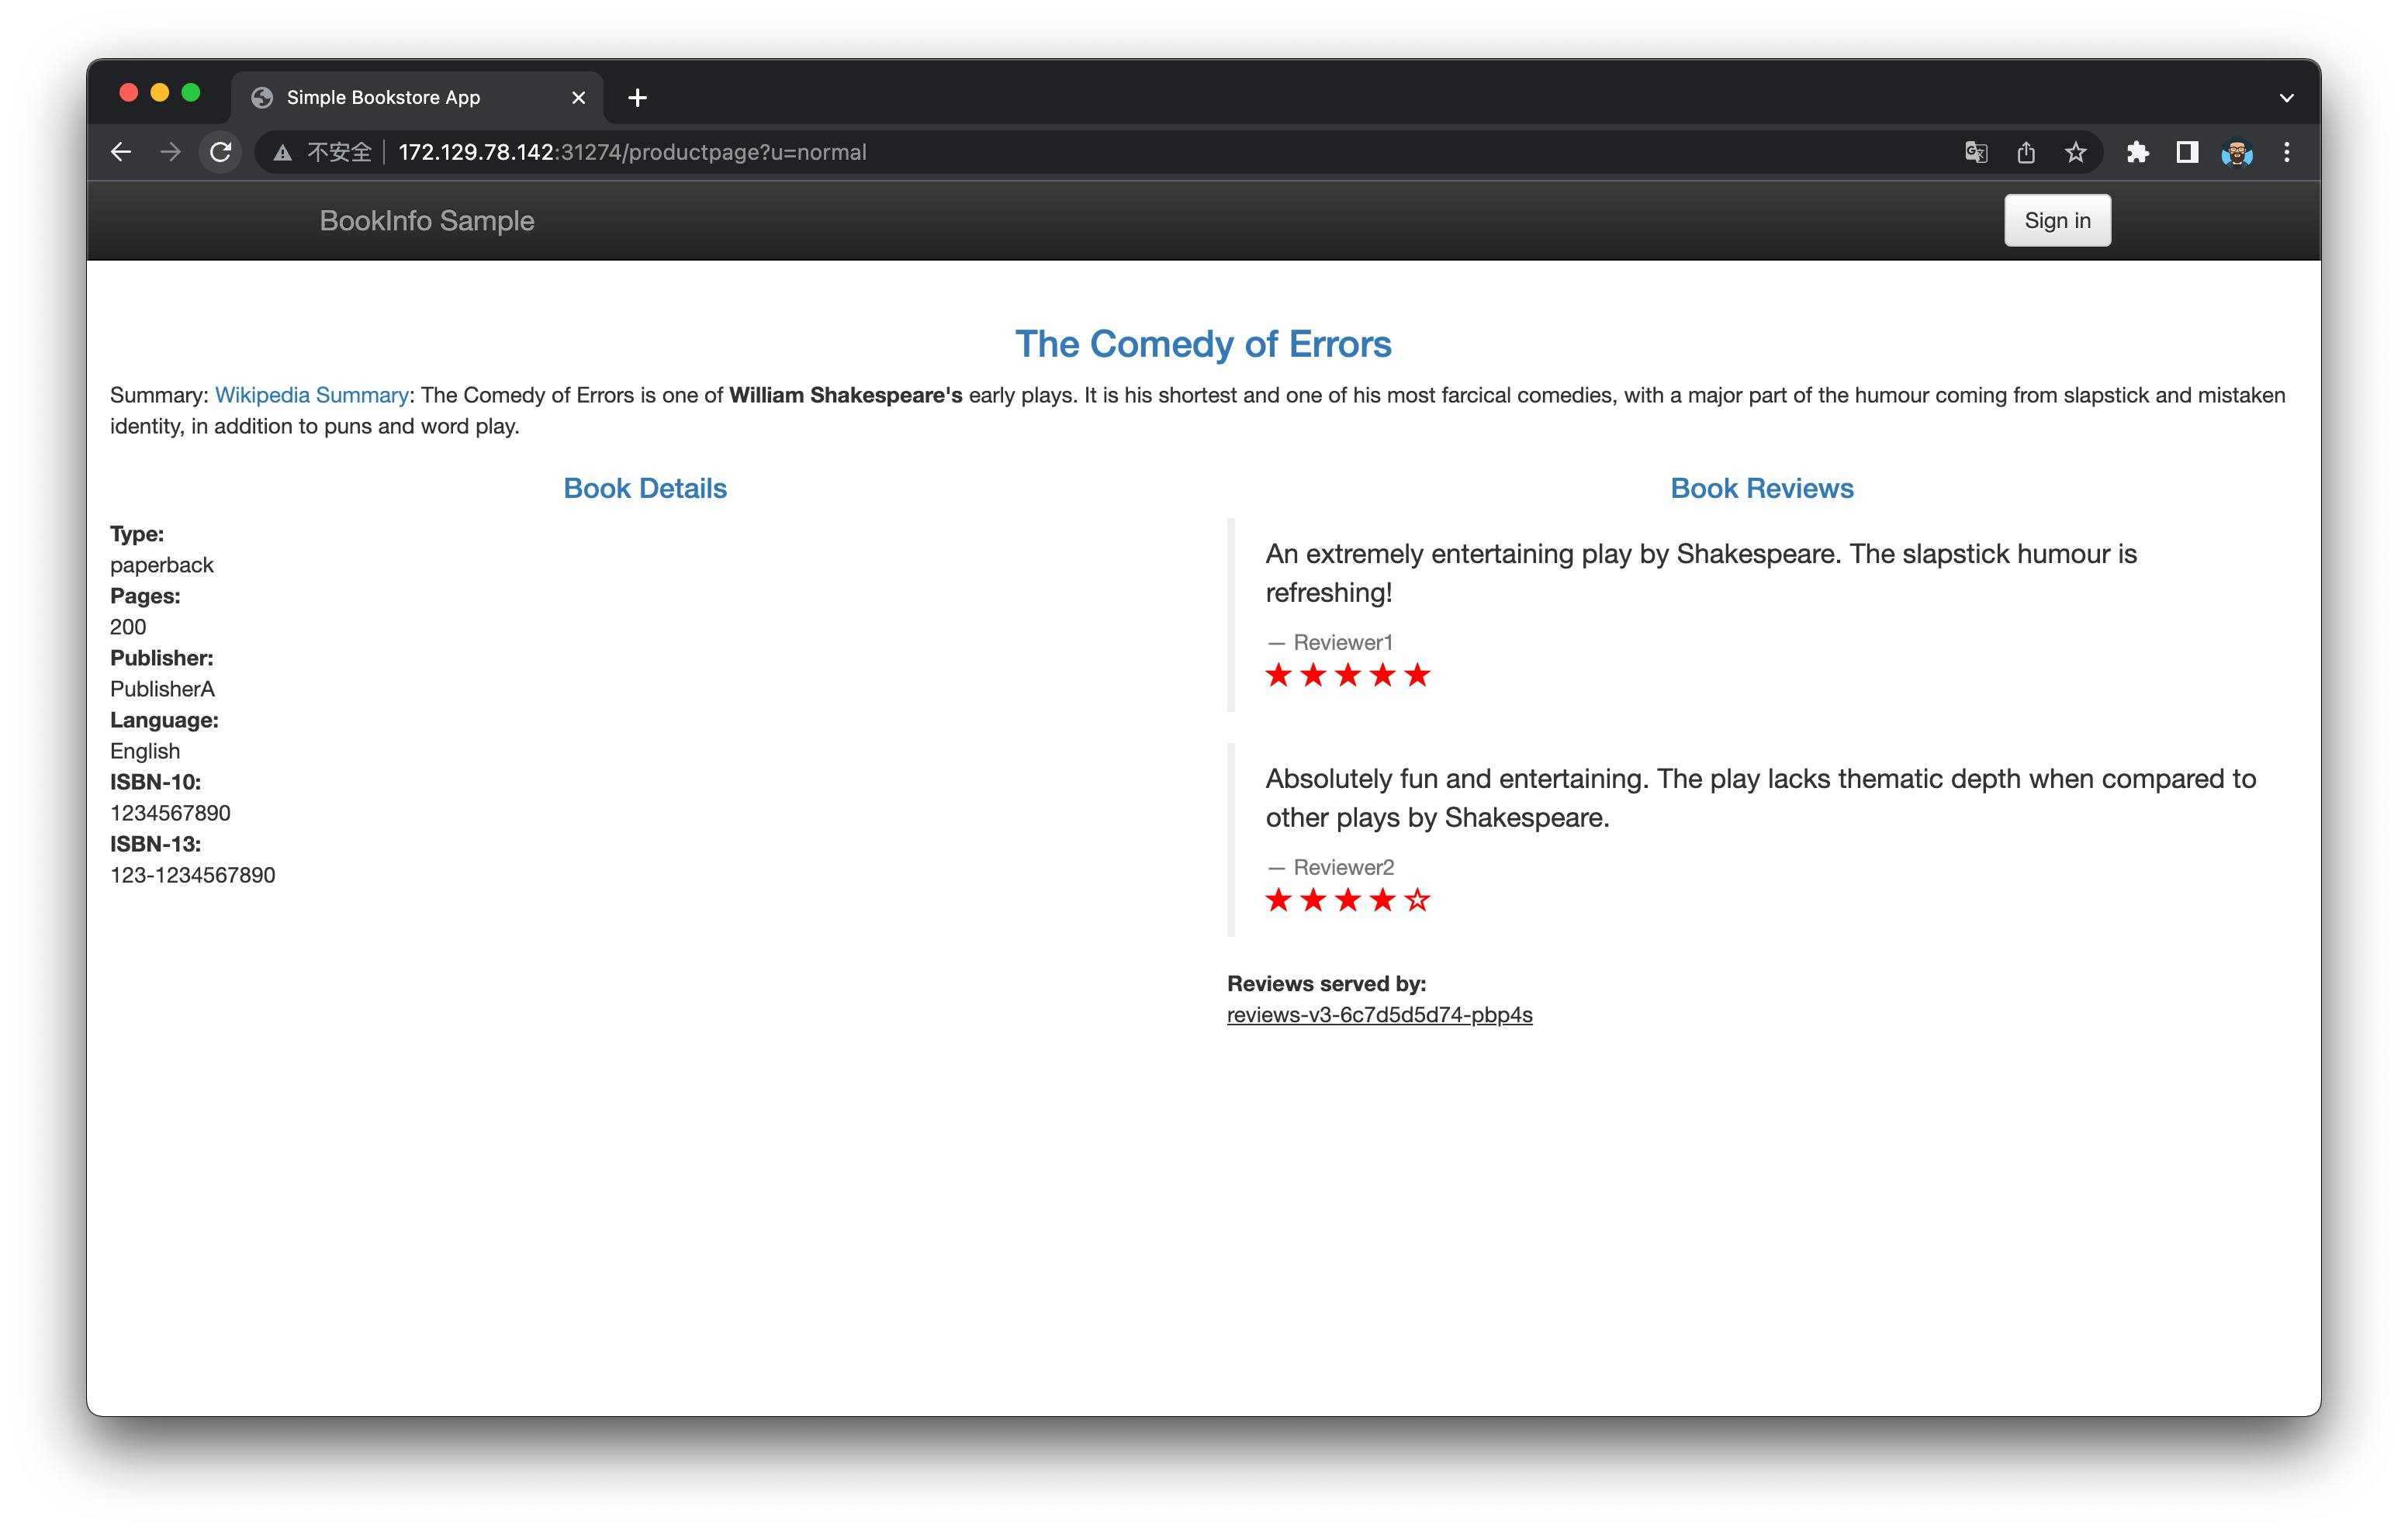
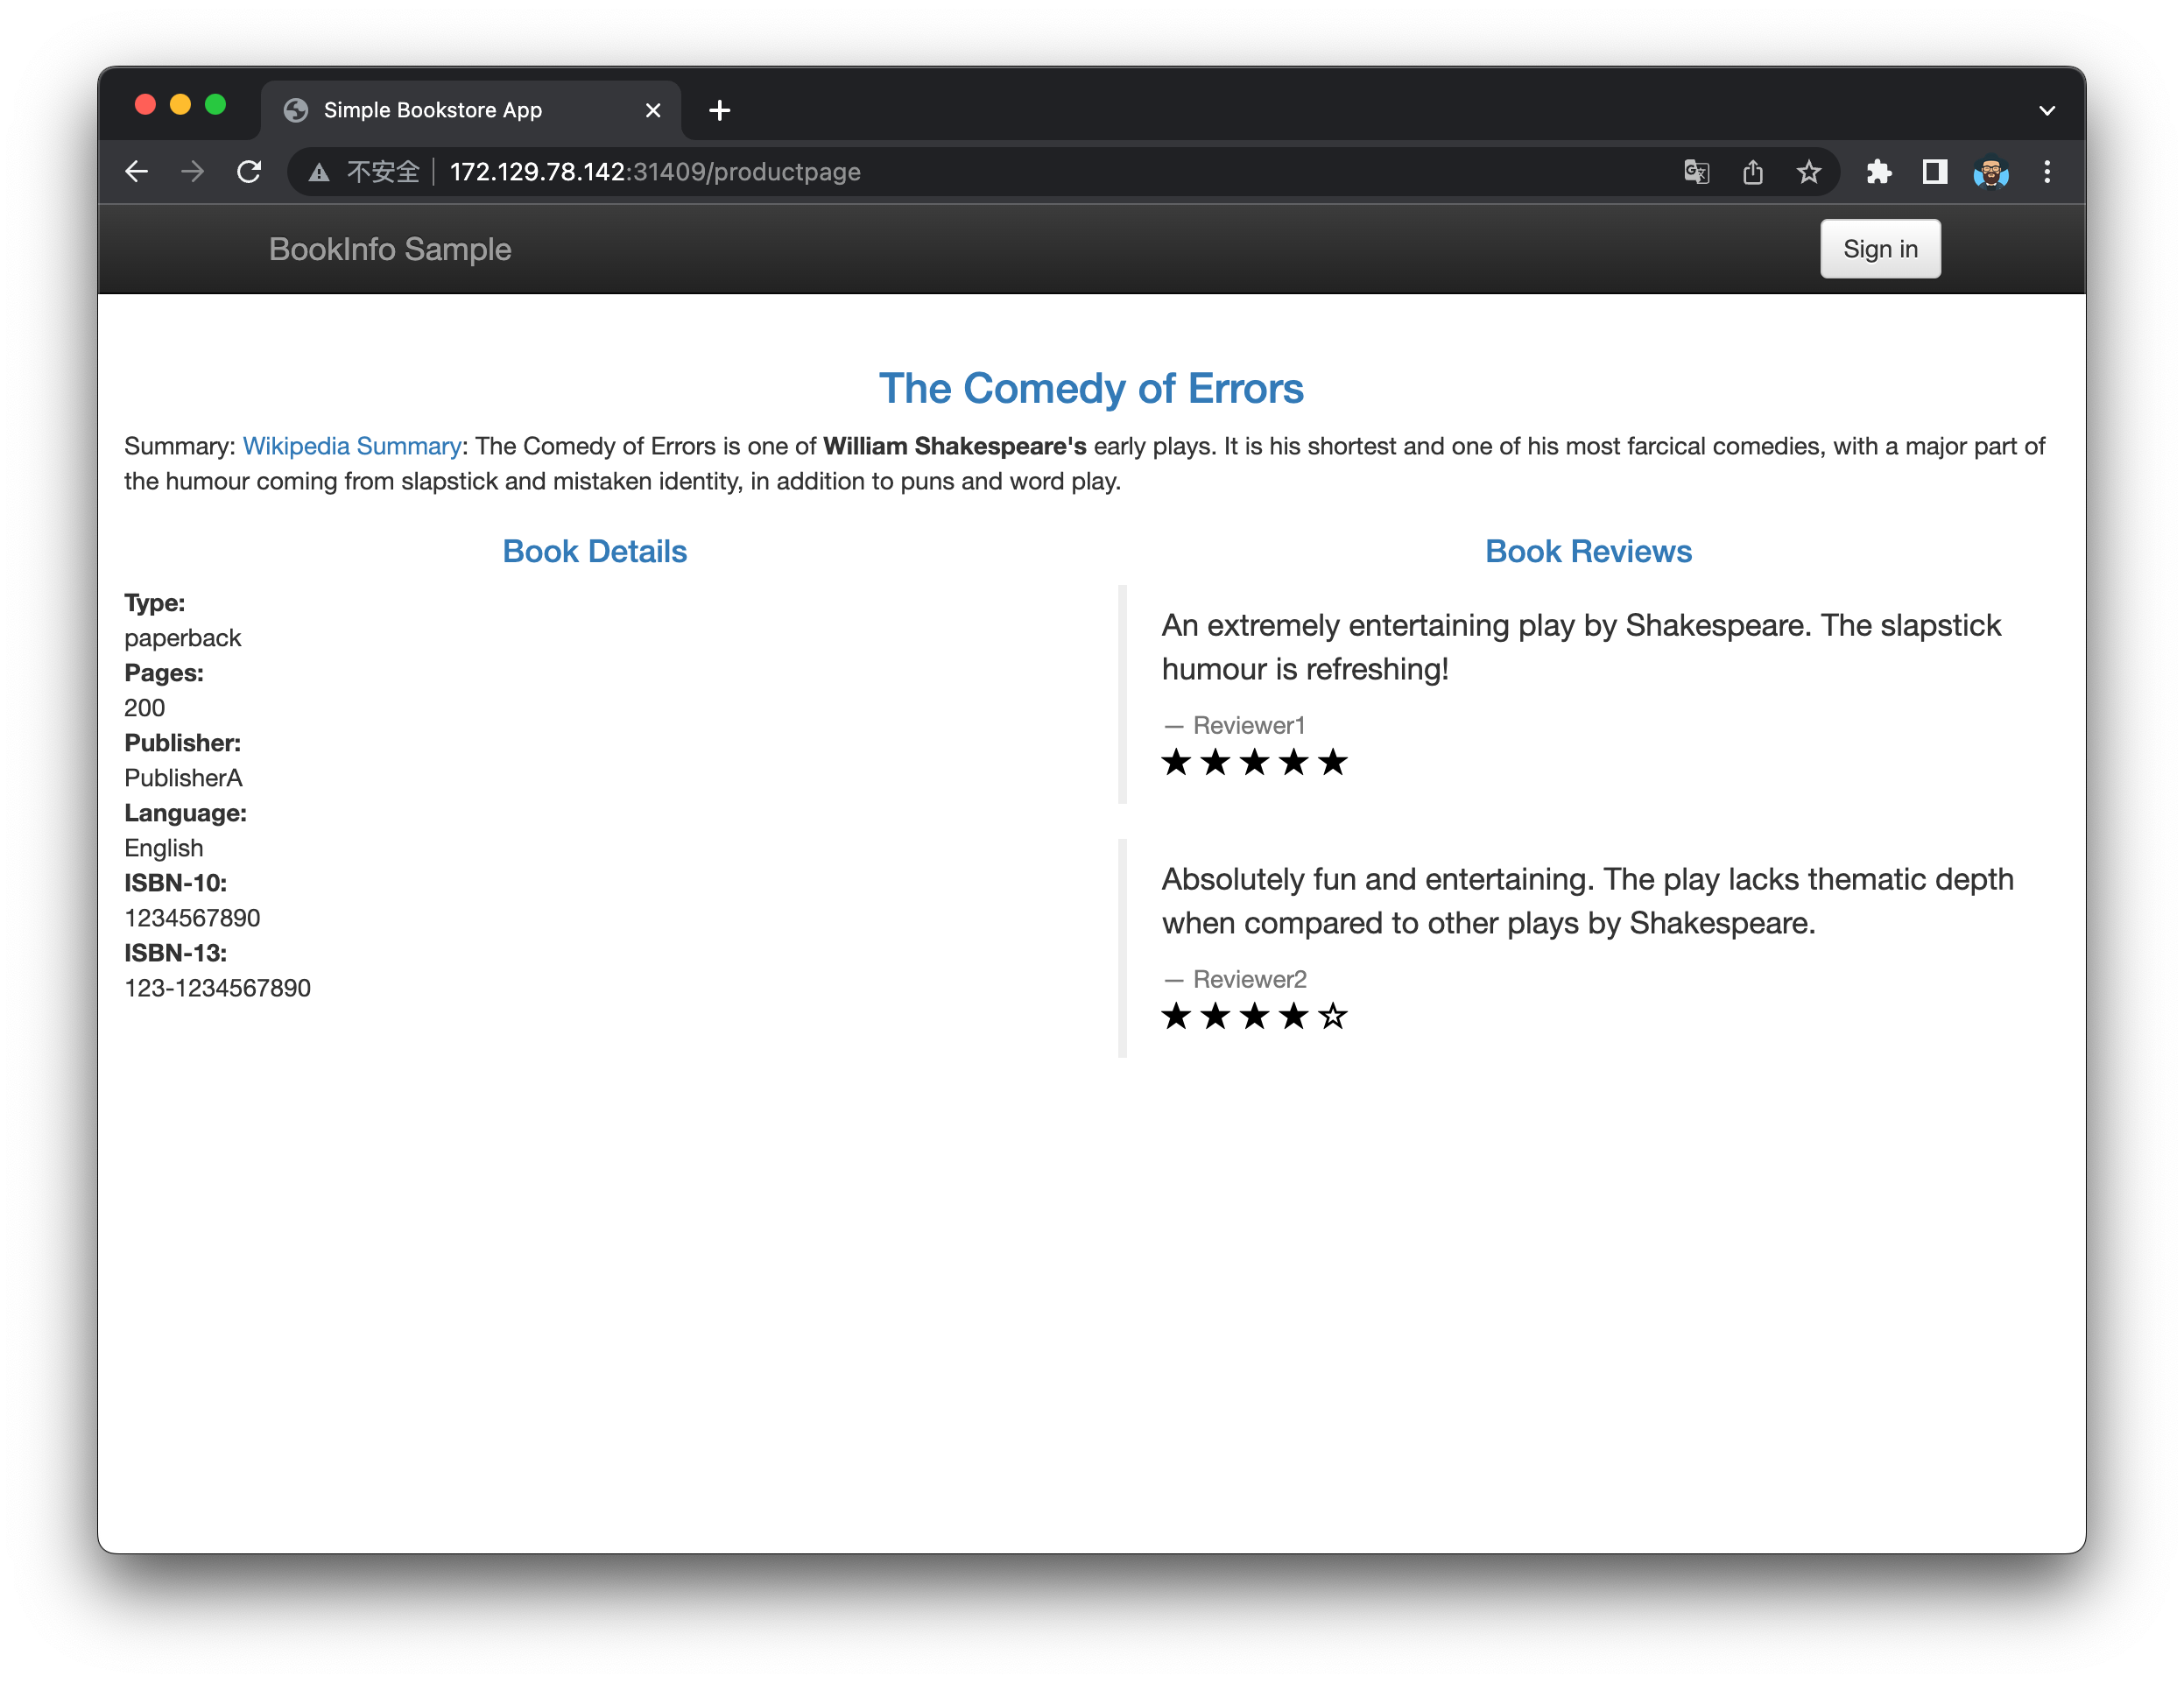
微服务 Bookinfo 示例
1
2
3
4
5
6
7
8
9
10
11
12
13
14
15
16
17
18
19
20
21
22
$ kubectl apply -f https://raw.githubusercontent.com/istio/istio/master/samples/bookinfo/platform/kube/bookinfo.yaml
检测服务是否可以 Ping 通
1
2
3
4
5
6
7
8
9
$ kubectl edit cm kube-proxy -n kube-system'{print $1}' )
1
2
3
4
5
6
7
8
9
10
11
12
13
14
15
16
17
18
19
20
21
22
23
24
25
26
27
28
29
30
31
32
33
34
35
36
37
38
39
40
41
42
43
44
45
46
47
48
49
50
51
$ vim busybox.yamltty : true exec -it busybox -- ping -c 3 productpage.default.svc.cluster.localseq =0 ttl=64 time =0.111 msseq =1 ttl=64 time =0.064 msseq =2 ttl=64 time =0.102 ms // 三次都能 ping 通exec -it busybox -- /bin/sh'{.spec.clusterIP}'
1
2
3
4
5
6
7
8
9
10
11
12
13
14
15
16
17
18
19
20
21
22
23
24
25
26
[root@kubeedge-k8s-node ~]# kubectl describe svc productpage
1
2
3
4
5
6
7
8
9
10
11
12
13
14
$ kubectl edit svc productpage
服务网格
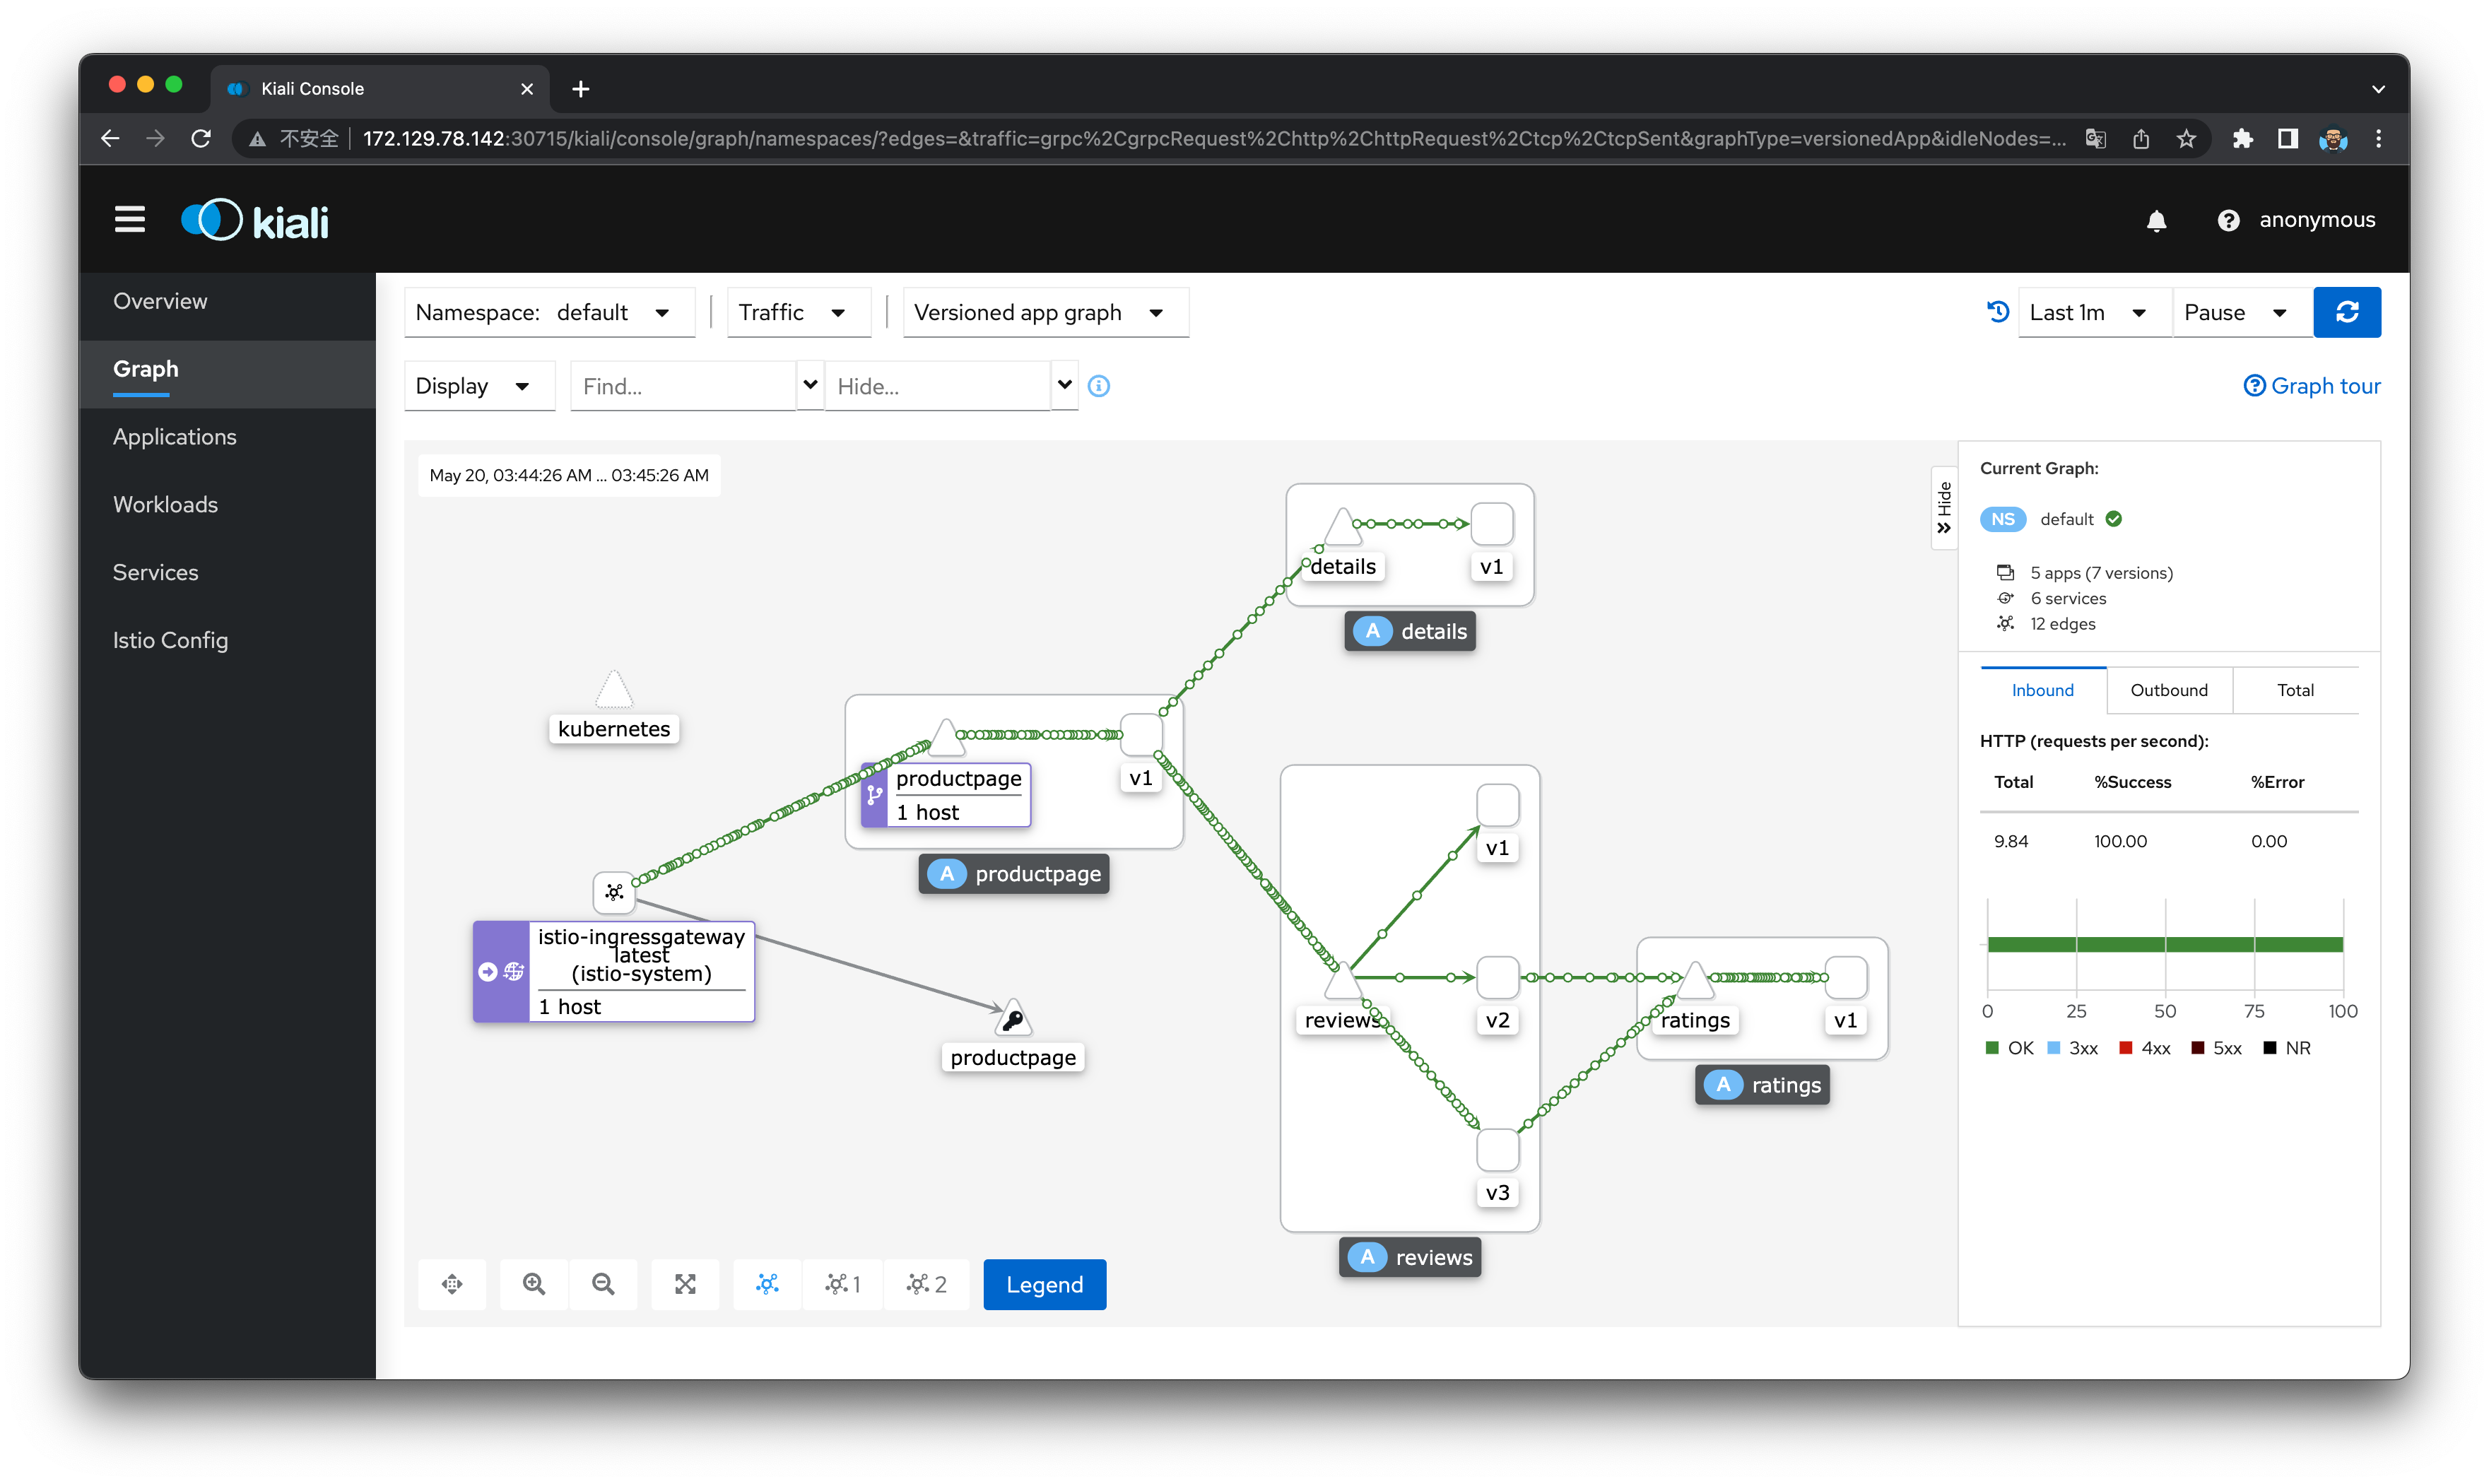
服务网格解决方案 Istio
1 2 3 4 5 6 7 8 9 10 11 12 13 14 15 16 17 18 19 20 21 22 23 24 25 26 27 28 29 30 31 32 33 34 35 36 37 38 39 40 41 42 43 44 45 46 47 48 49 50 51 52 53 54 55 56 57 58 59 60 61 62 63 64 65 66 67 68 69 70 71 72 73 mv istio-1.11.3/bin/istioctl /usr/local/bin/in "istio-system" set profile=demo -ycd istio-1.11.3exec "$(kubectl get pod -l app=ratings -o jsonpath='{.items[0].metadata.name}') " -c ratings -- curl -sS productpage:9080/productpage | grep -o "<title>.*</title>" type 为 NodePorttype : NodePort
1 2 3 4 5 6 7 8 9 10 11 12 13 14 for deployment "kiali" rollout to finish: 0 of 1 updated replicas are available..."kiali" successfully rolled outtype 为 NodePort
可以看到流量的详细走势和相关请求数据
1 2 3 4 5 6 7 8 9 10 11 12 13 14 15 16 17 18 19 20 21 22 23 24 25 26 27 28 29 30 31 32 33 34 35 36 37 38 39 40 41 42 43 44 45 46 47 48 49 50 51 "bookinfo-gateway" ] ["*" ] 66mcd samples/bookinfo/networking/ls -al
本章小结 概述
定义: 云原生技术使得企业能够在公有云、私有云、混合云的环境下, 构建和运行可扩展的应用程序, 云原生技术包括容器、服务网格、微服务、不可变基础设施和声明式 API 5 个关键技术
生态: 云原生技术的生态系统包括开源项目、云服务提供商、云原生计算基金会
容器
容器调用链路: 运行容器的工具 -> Kubernetes 的 API -> 容器运行时 -> 容器运行规范 -> 容器镜像
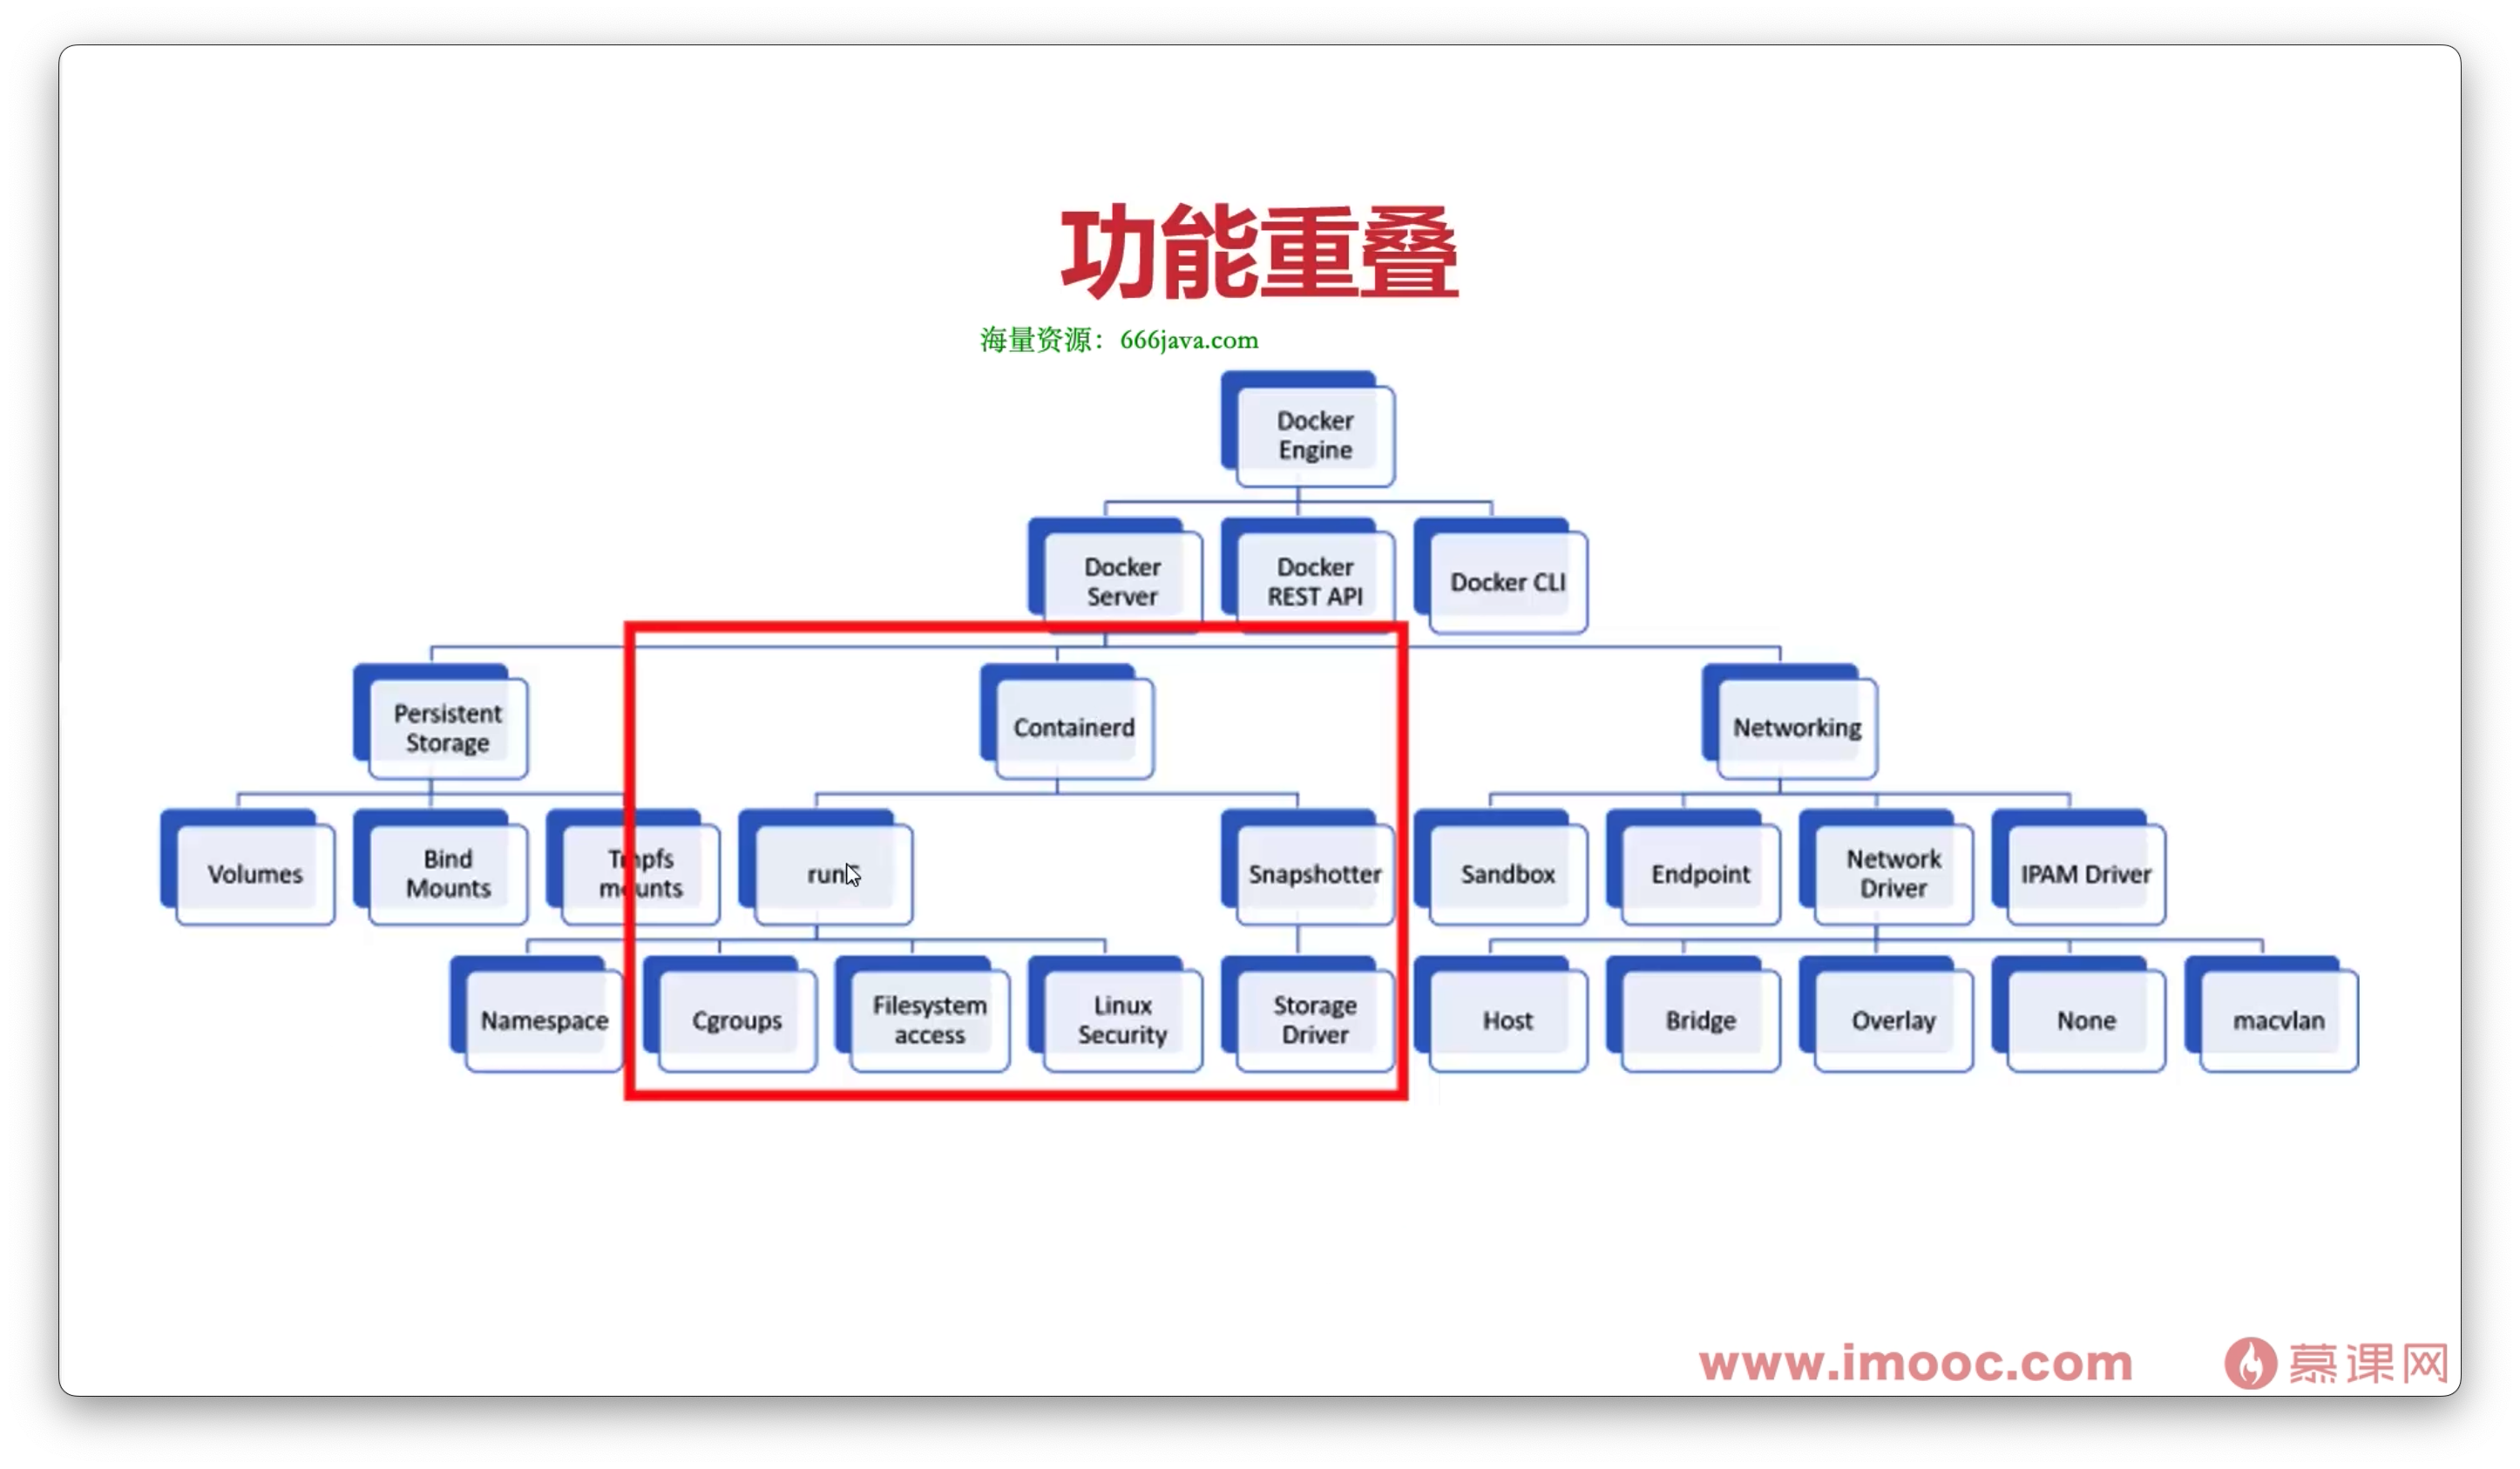
K8s与Docker: K8s 是一个容器编排工具, Docker 是一个容器运行时, K8s 可以管理多个 Docker 容器, Dockershim 是 K8s 与 Docker 之间的桥梁, 后续 K8s 会使用 CRI 替代 Dockershim, CRI 是容器运行时接口, 用于定义容器运行时与 K8s 之间的接口, 因为 Docker 和 K8s 之间的功能重叠
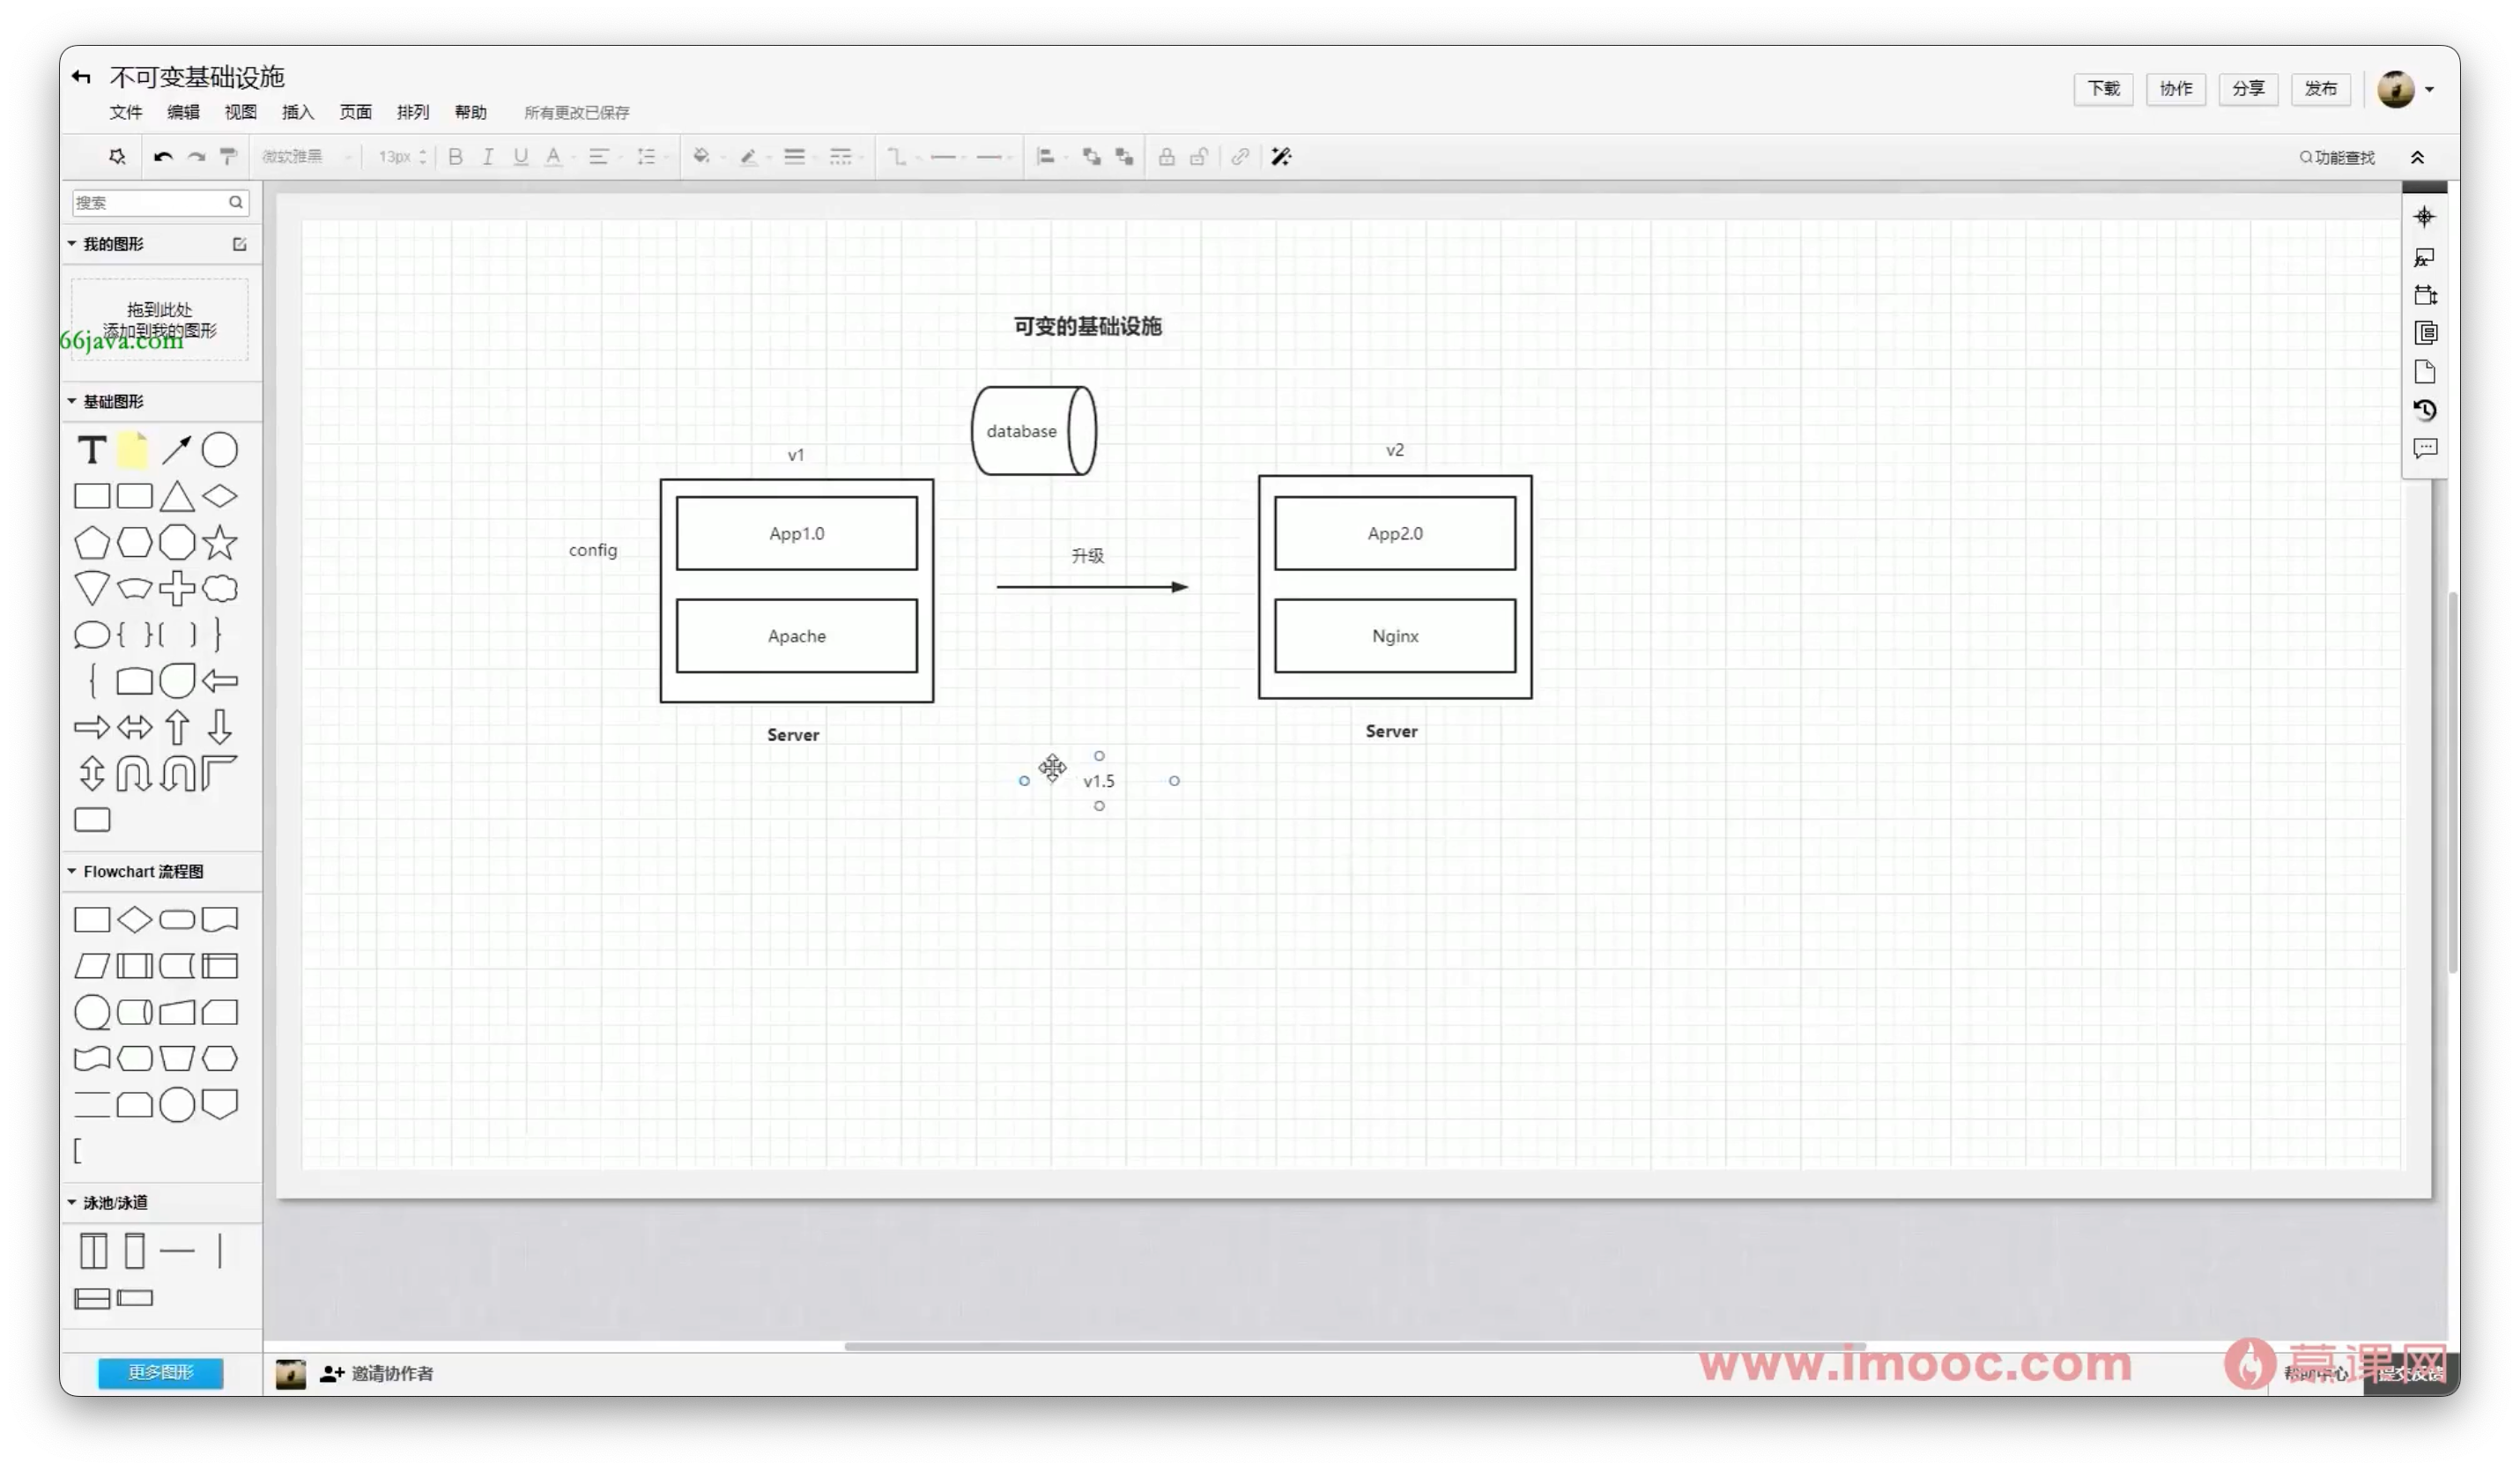
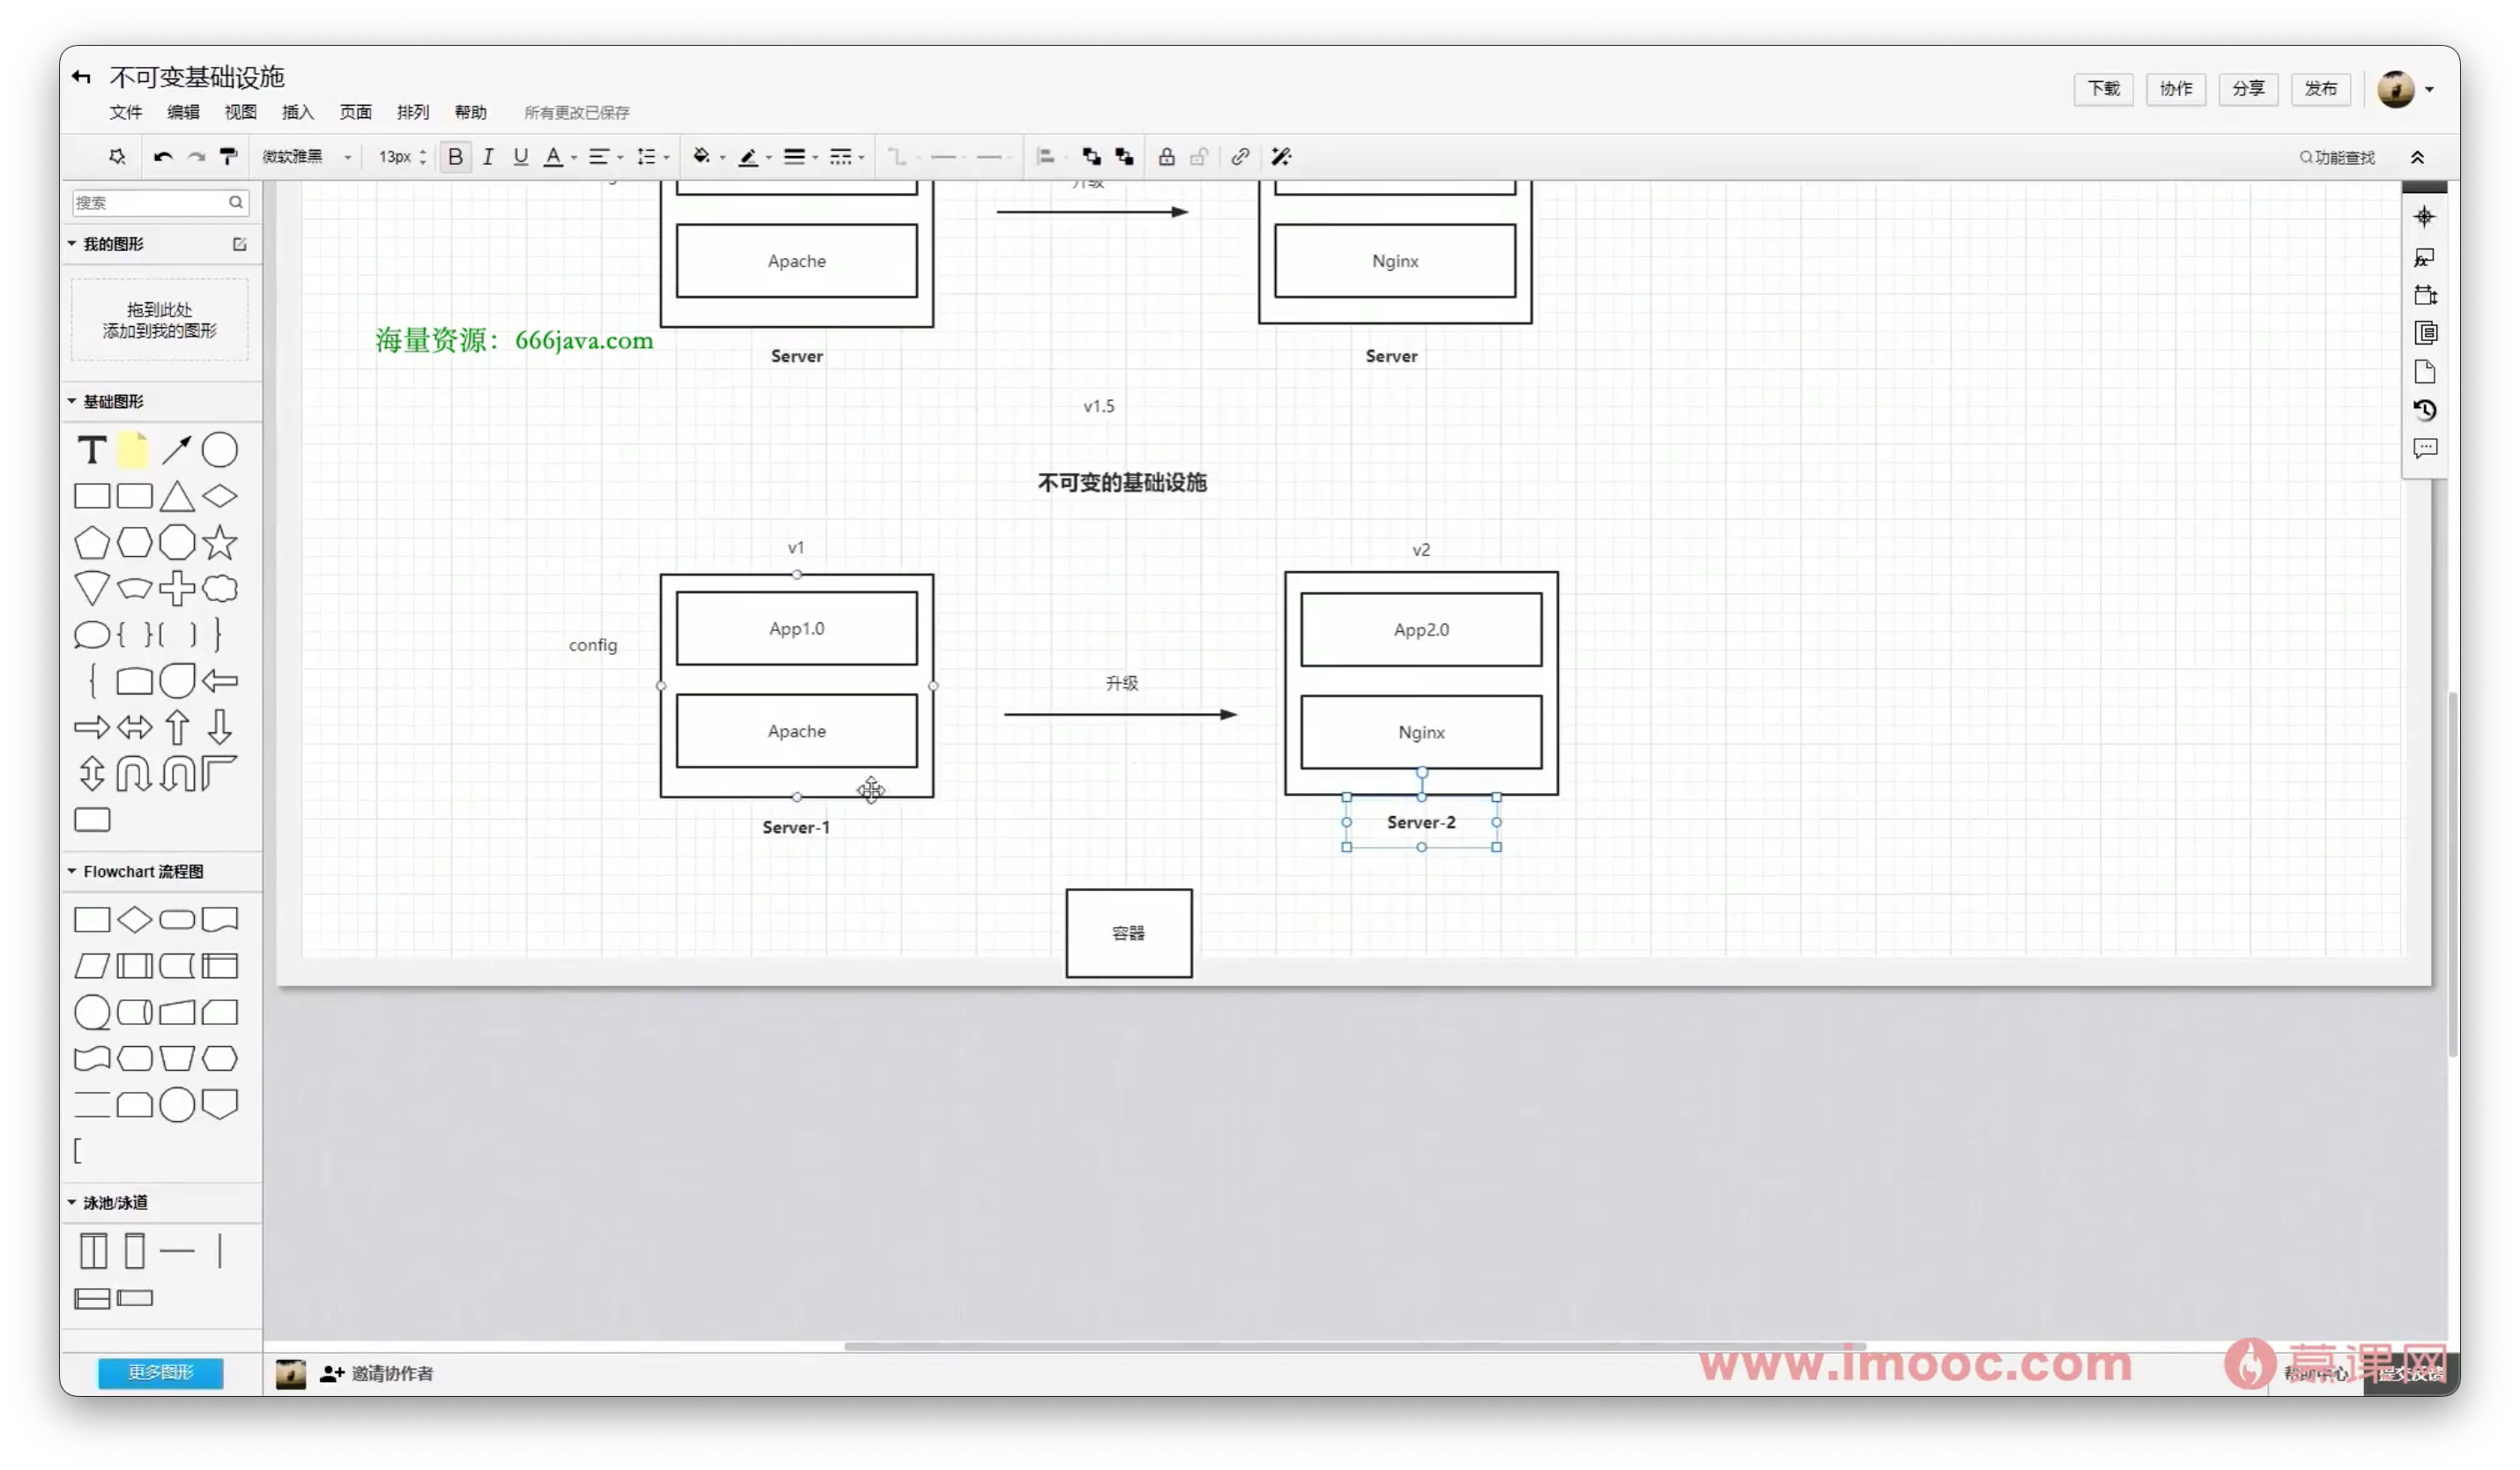
不可变基础设施
可变基础设施: 通过手动或自动的方式, 在服务器上安装操作系统和应用程序, 通常使用配置管理工具, 如 Ansible, Chef, Puppet
不可变基础设施: 通过镜像的方式, 在服务器上安装操作系统和应用程序, 通常使用 Packer, Vagrant, Dockerfile
容器: 不可变基础设施的最佳实践
难点:
基础设施的理解: 基础设施是指服务器、网络、存储、操作系统、中间件、应用程序等
从可变基础设施到不可变基础设施的转变: 从手动安装到自动化安装, 从配置管理工具到镜像, 从物理机到虚拟机到容器
声明式 API
举例: K8s 的 API 对象包括 Pod、Service、Deployment、Namespace、ConfigMap、Secret 等, 这些 API 对象都是声明式的, 通过 YAML 或 JSON 文件定义, 通过 kubectl 命令行工具或 API 接口进行管理
声明式 API 的优势: 1. 通过 YAML 或 JSON 文件定义, 便于版本控制, 便于管理, 便于迁移 2. 通过 kubectl 命令行工具或 API 接口进行管理, 便于自动化管理, 便于集成到 CI/CD 流程中
Docker-Compose: Docker-Compose 是 Docker 官方提供的一个工具, 用于定义和运行多个 Docker 容器
kubectl: kubectl 是 K8s 官方提供的命令行工具, 用于管理 K8s 集群
Docker-Compose 与 K8s 的区别:
Docker-Compose 是 Docker 官方提供的工具, K8s 是 CNCF 提供的工具
Docker-Compose 适用于单机环境, K8s 适用于多机环境
难点
Docker-Compose 实践:
安装 Docker-Compose
编写 Docker-Compose YAML 文件
运行 Docker-Compose YAML 文件
查看 Docker-Compose 运行状态
停止 Docker-Compose 运行
K8s 环境搭建与实践:
微服务
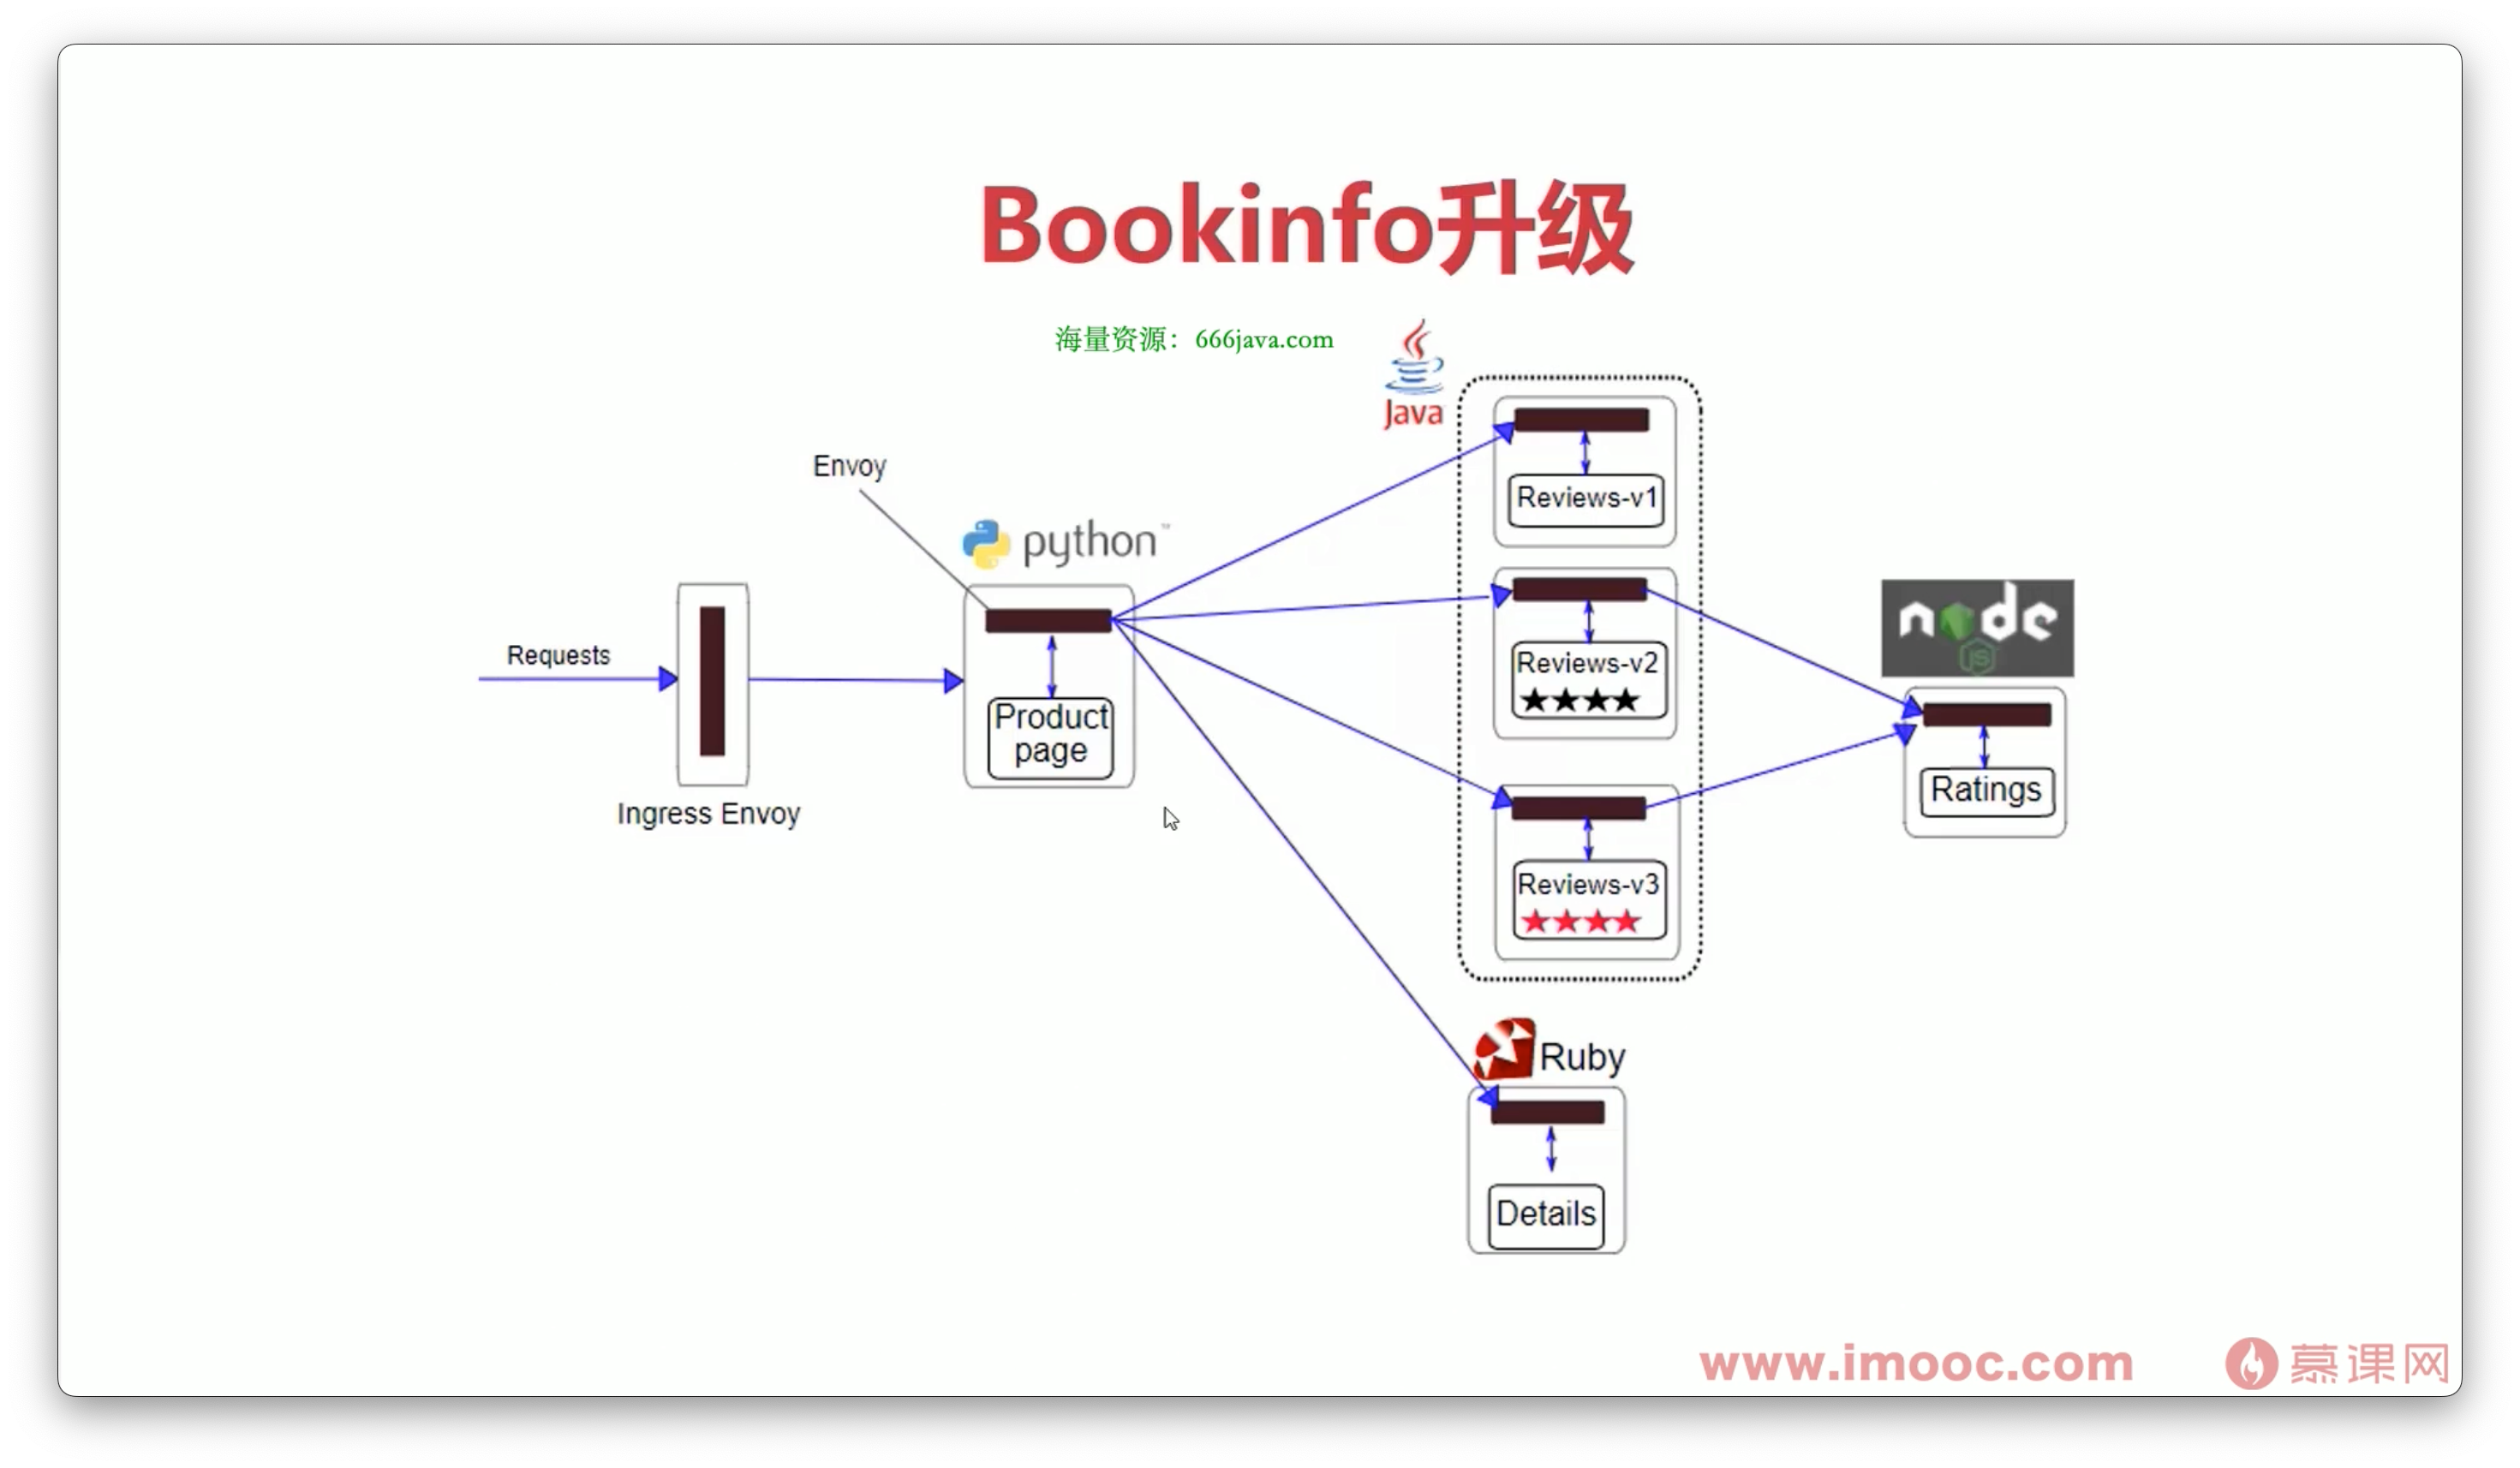
Bookinfo 应用程序: Bookinfo 是一个简单的应用程序, 用于演示 K8s 的功能, Bookinfo 应用程序包括四个微服务, 分别是 productpage、details、reviews、ratings
seriveName: 服务名称, 用于标识服务, 通常使用 DNS 域名格式, 如 reviews.default.svc.cluster.local
kube-dns: K8s 集群中的 DNS 服务, 用于解析服务名称, 通常使用 CoreDNS 作为 DNS 服务
pod: K8s 中的最小调度单元, 通常包含一个或多个容器, 通常使用 YAML 或 JSON 文件定义, 通常使用 kubectl 命令行工具或 API 接口进行管理
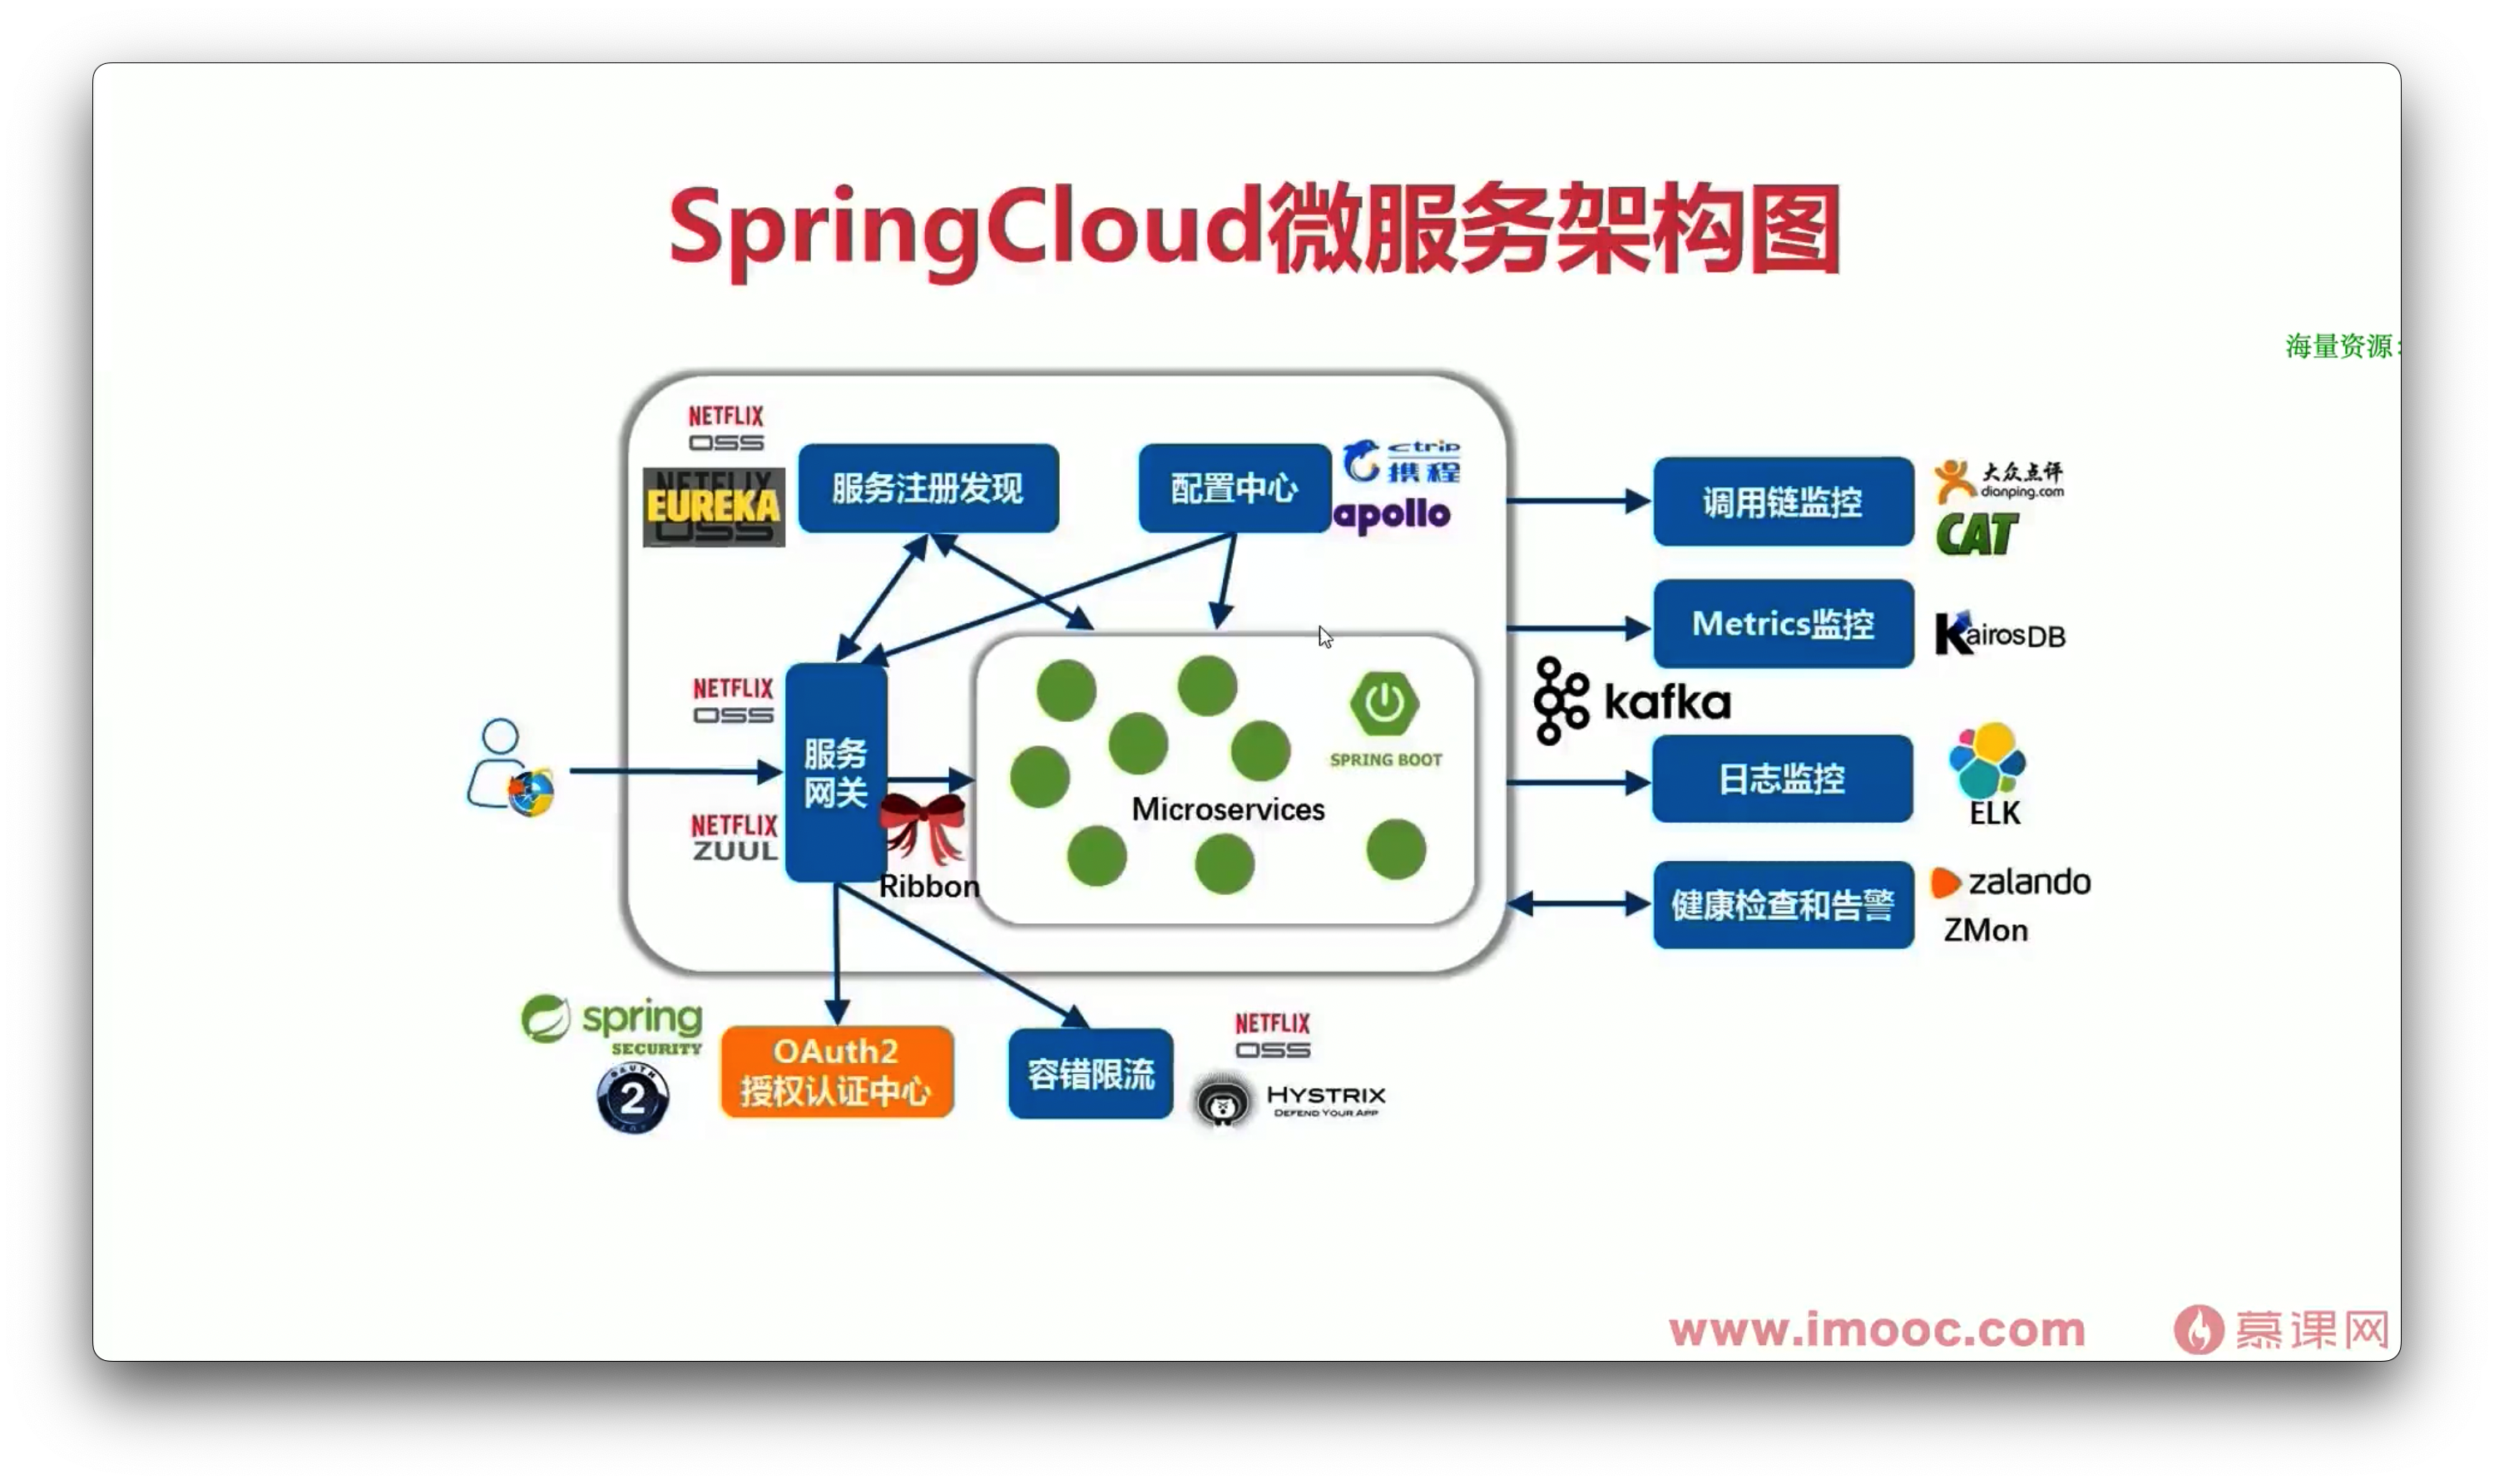
与 SpringCloud 对比:
SpringCloud 是 Java 生态圈的微服务框架, K8s 是云原生技术的微服务框架
SpringCloud 适用于 Java 生态圈, K8s 适用于多语言生态圈
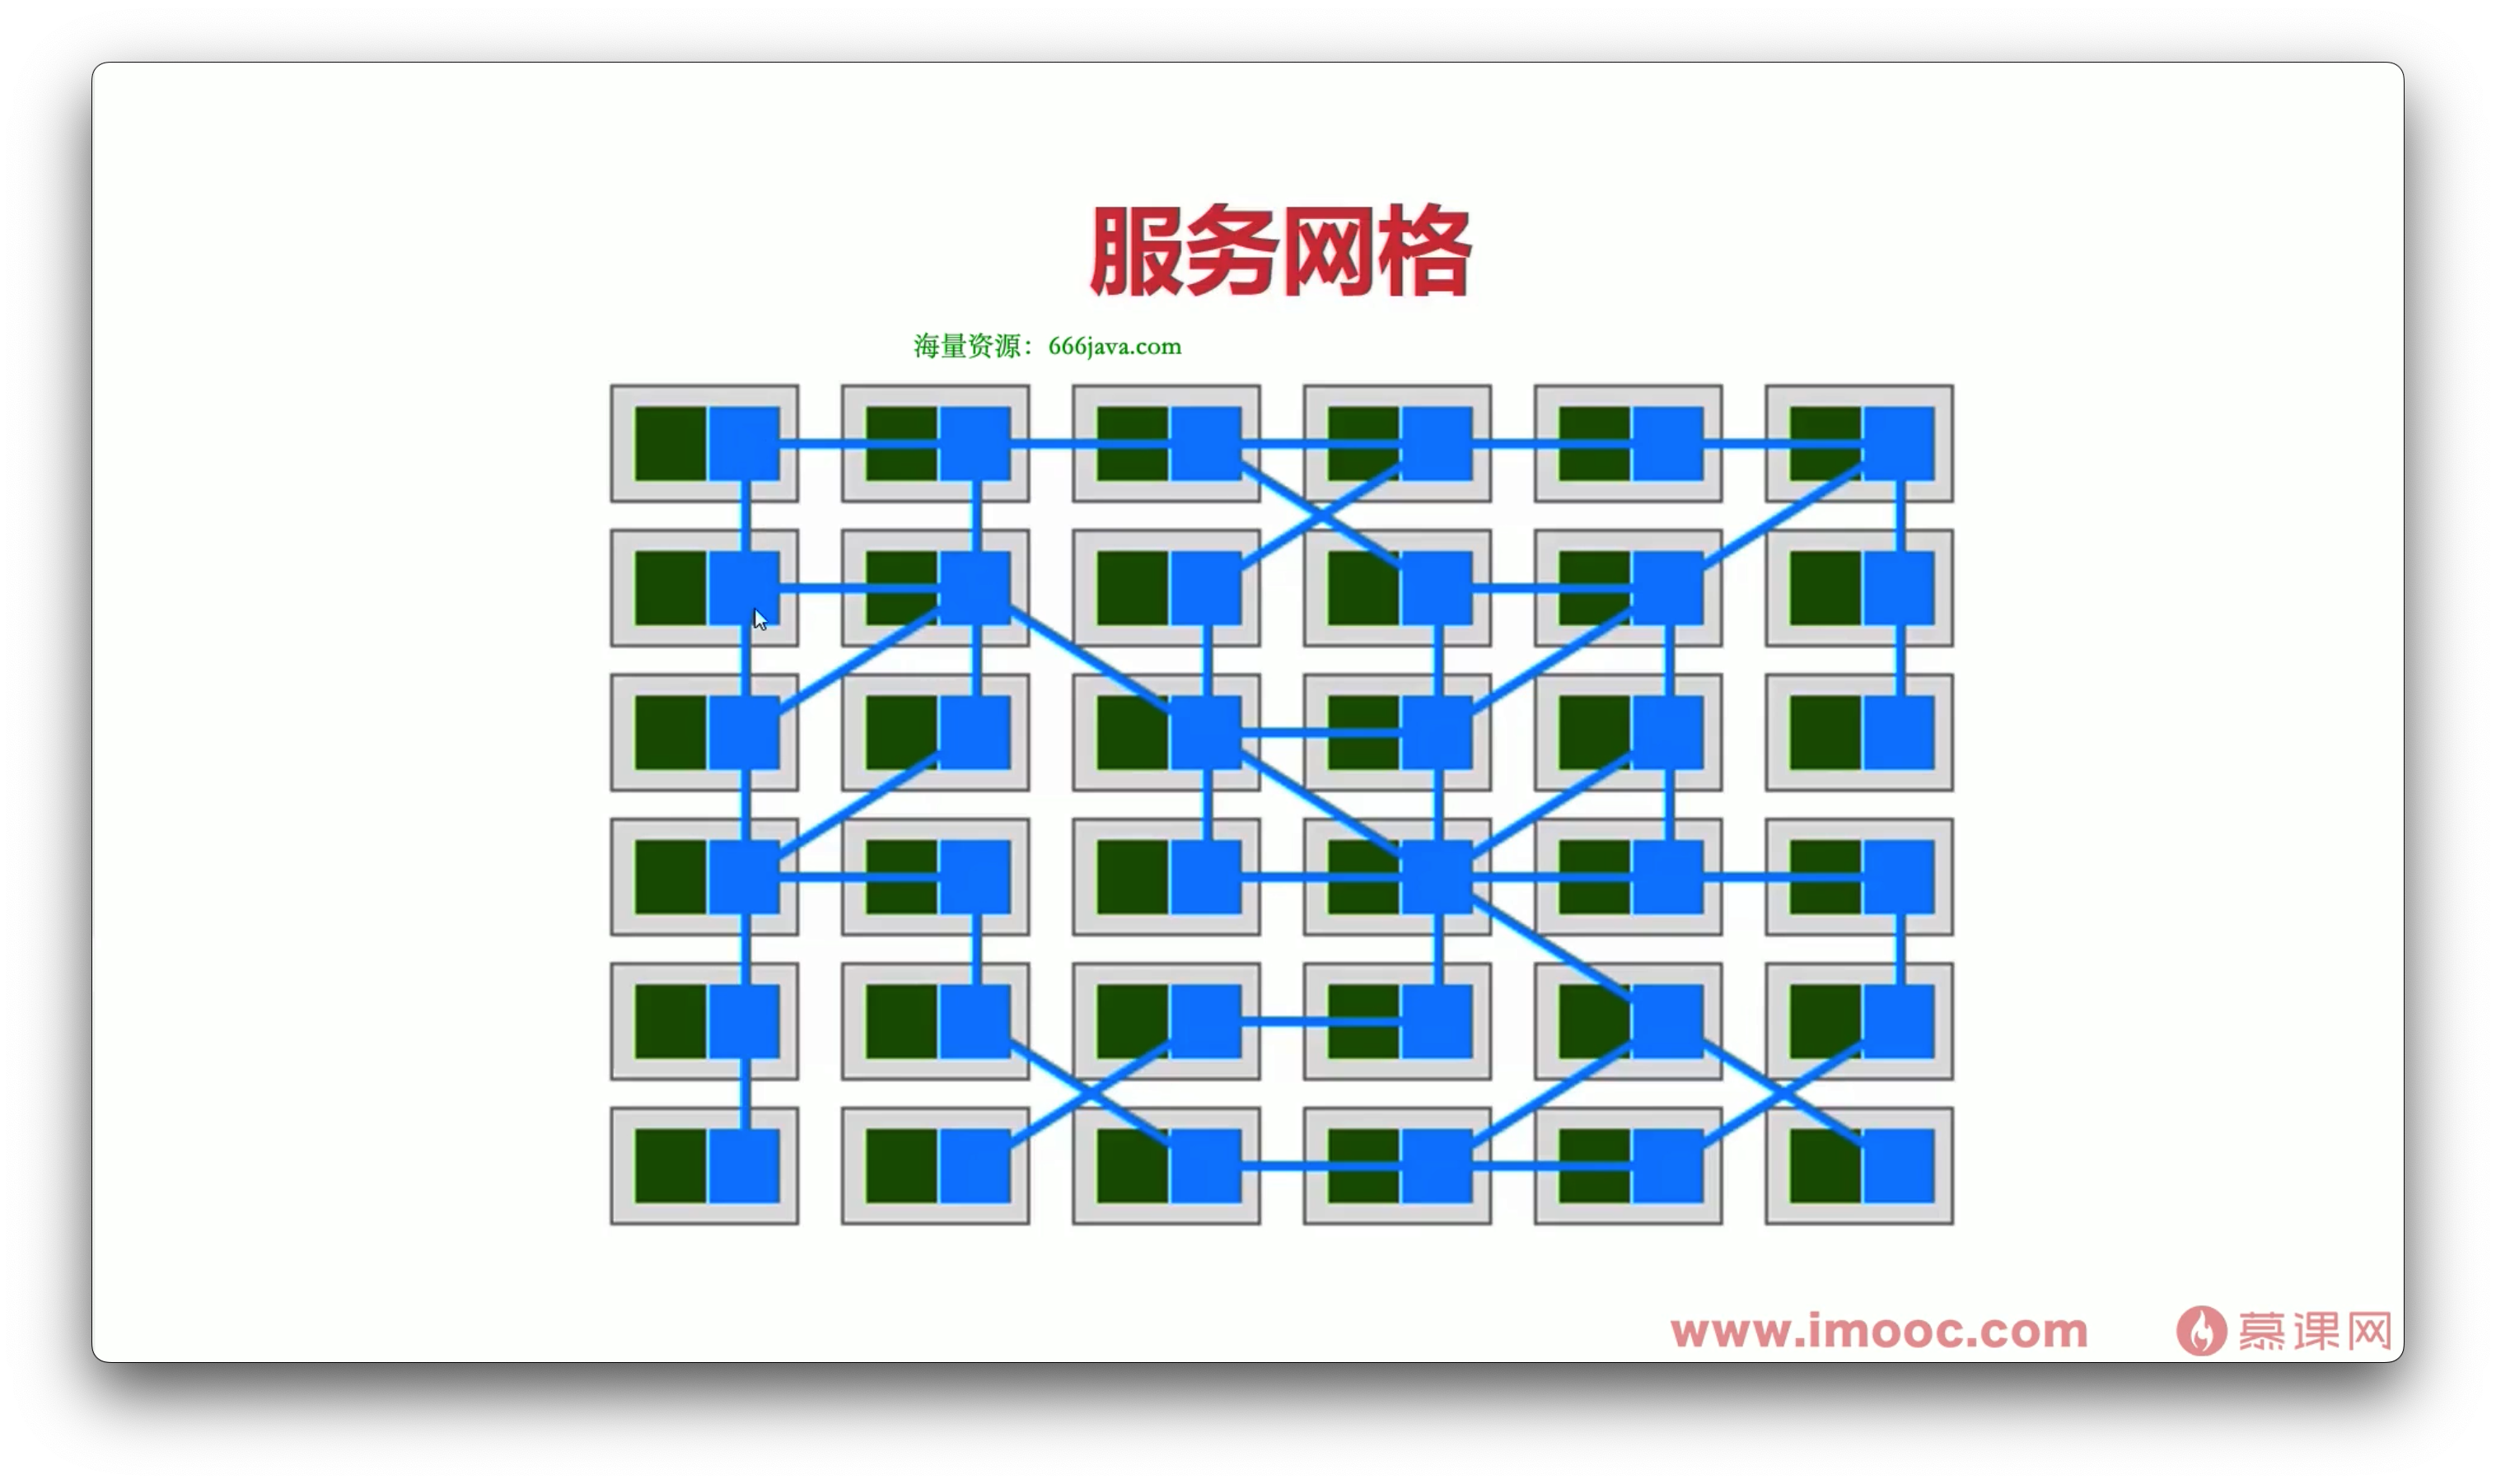
服务网格
概念: 服务网格是一种基础设施层面的微服务框架, 用于管理微服务之间的通信, 服务网格通常使用 Sidecar 模式实现, 服务网格通常使用 Envoy 作为 Sidecar
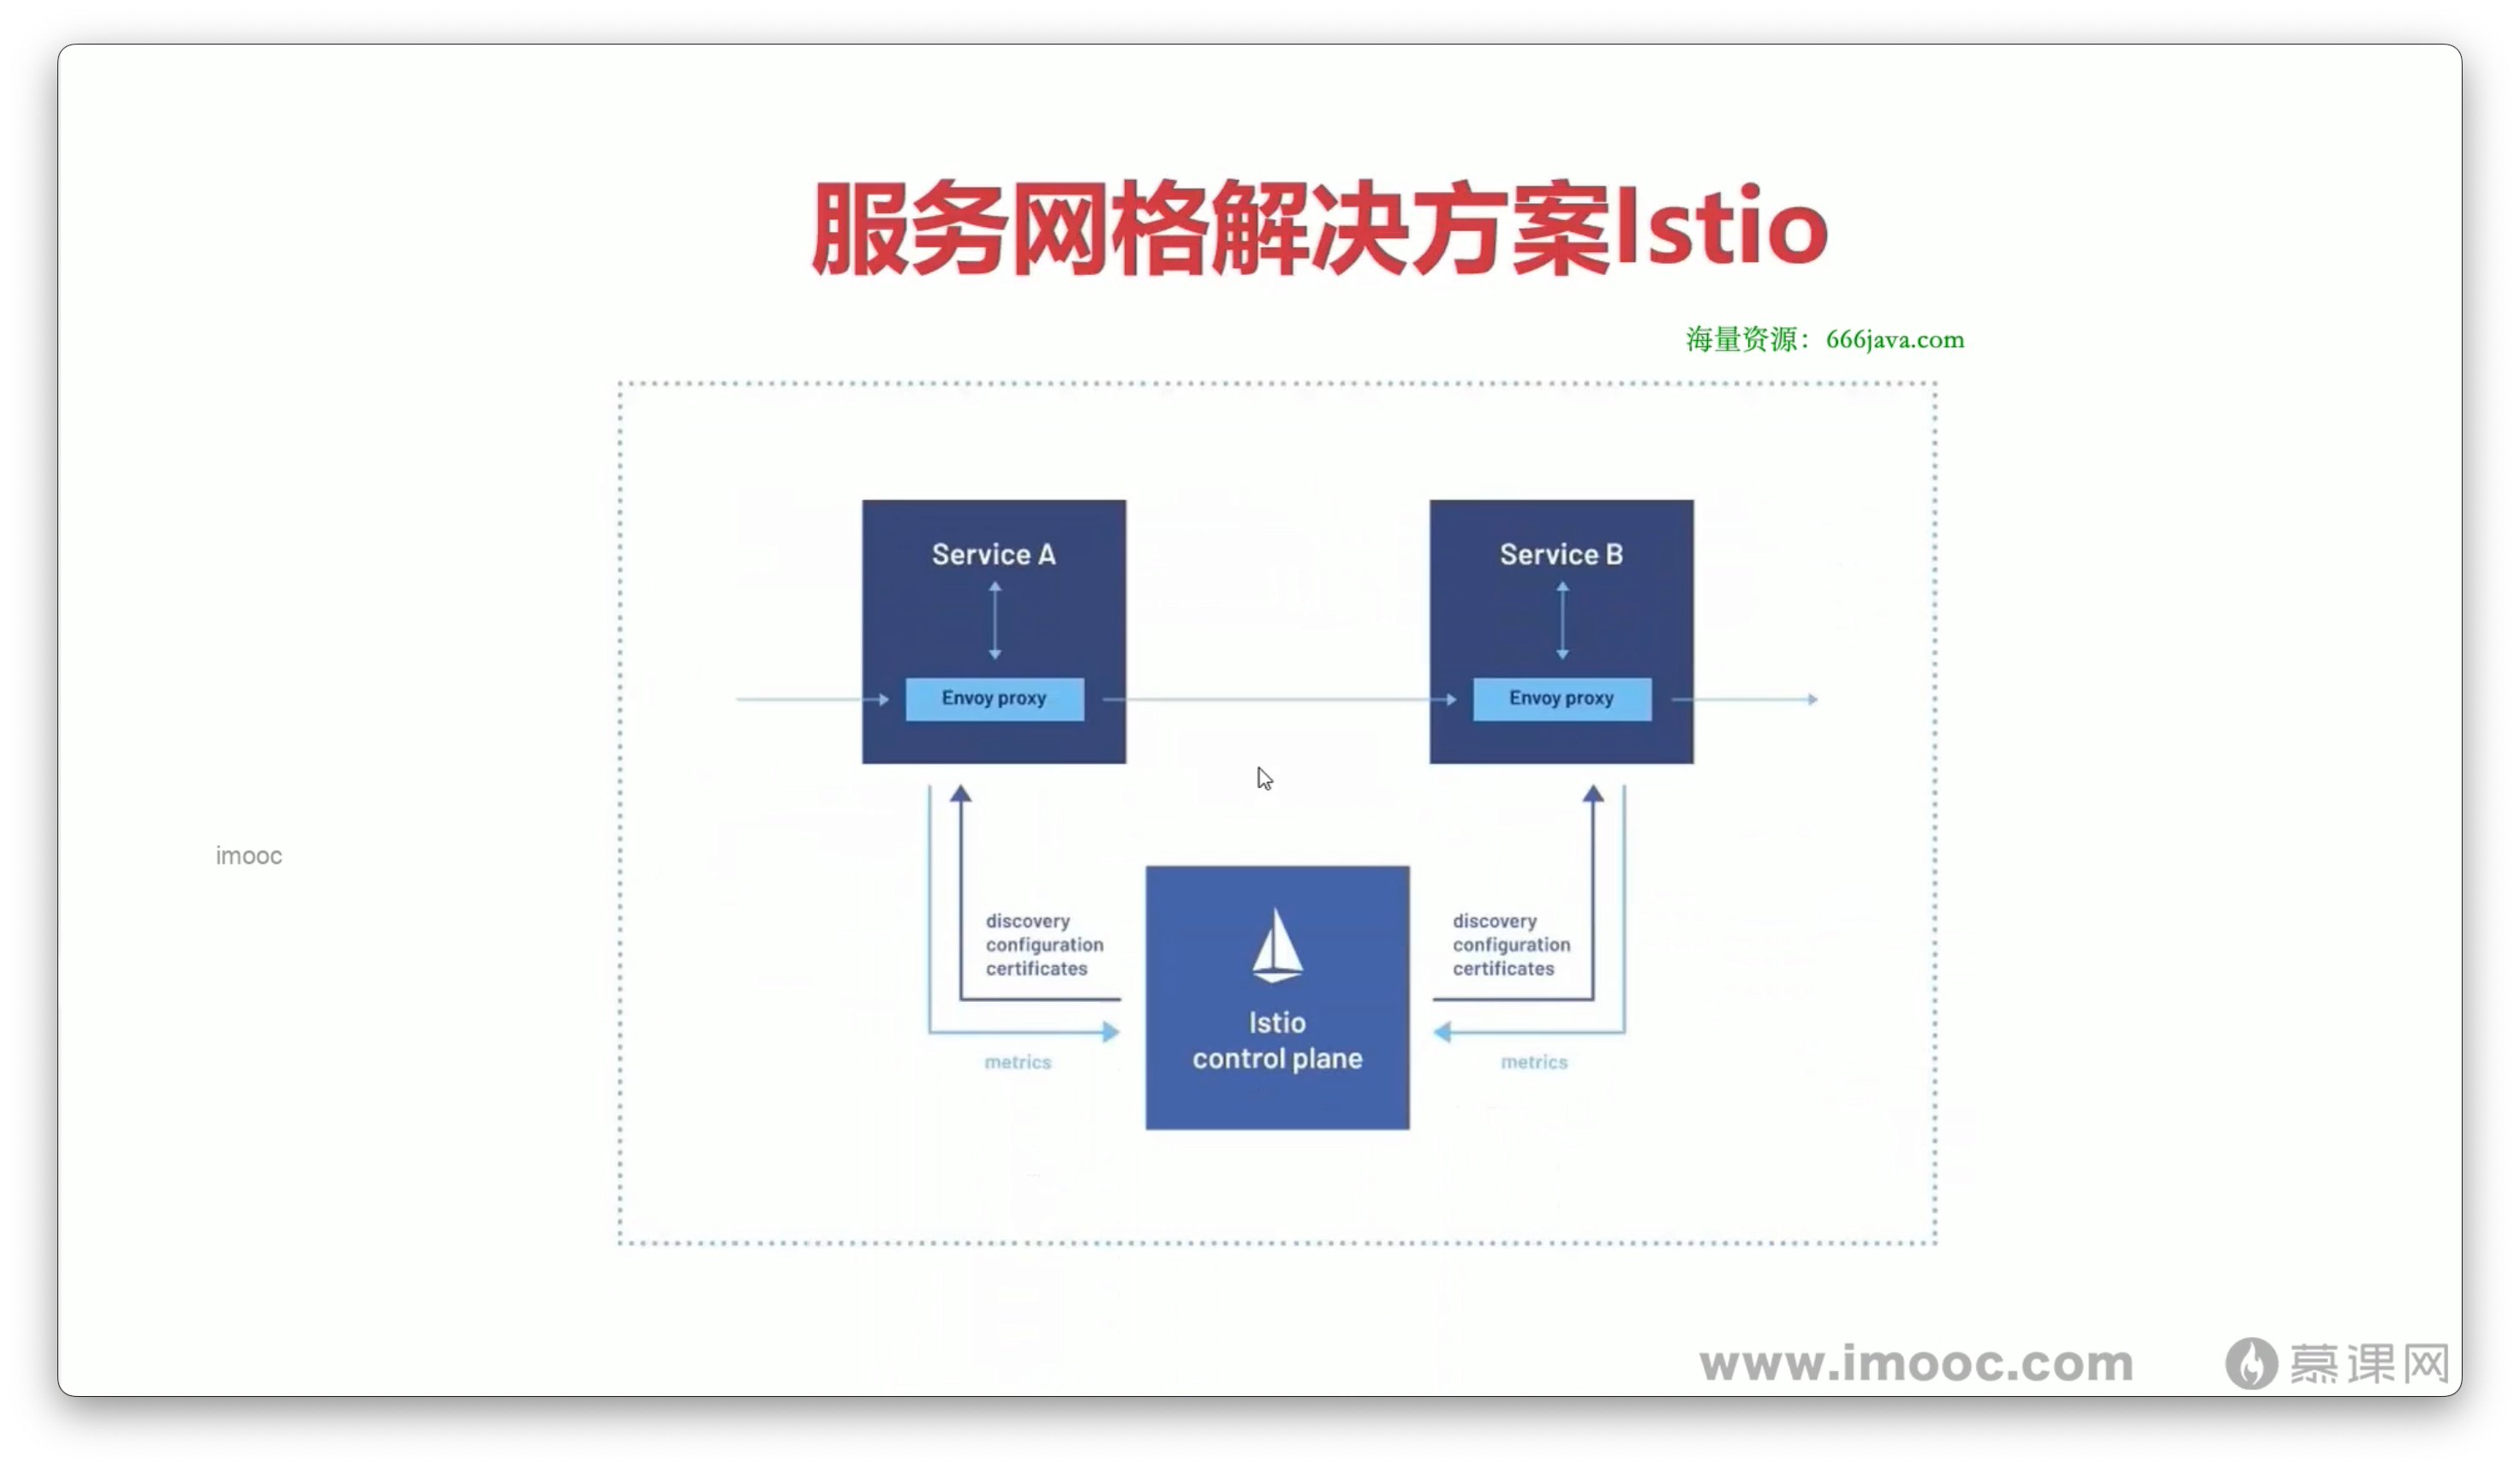
istio: istio 是一个开源的服务网格框架, 用于管理微服务之间的通信, istio 通常使用 Sidecar 模式实现, istio 通常使用 Envoy 作为 Sidecar
bookinfo 升级版: 与之前不同的是 不同服务之间的通信不再使用 K8s 的 Service, 而是使用 istio 的 Service, 通信方式不再是 HTTP, 而是使用 Envoy 的代理协议, 不再是组件之间的直接通信, 而是通过 Sidecar 通信
istio路由规则:
路由规则: 用于定义流量的路由规则, 通常使用 YAML 或 JSON 文件定义, 通常使用 istioctl 命令行工具或 API 接口进行管理
路由规则类型: 路由规则包括 VirtualService、DestinationRule、Gateway、ServiceEntry、Sidecar、EnvoyFilter 等类型
路由规则作用: 路由规则用于定义流量的路由规则, 用于流量控制、流量管理、流量监控、流量安全等
路由规则实践: 通过 YAML 文件定义路由规则, 通过 istioctl 命令行工具管理路由规则
与 SpringCloud 对比: 可以通过 Prometheus 和 Grafana 进行监控, 可以通过 Jaeger 进行链路追踪, 可以通过 Kiali 进行流量监控, 可以通过 Kiali 进行流量安全
【附录】K8S入门你至少需要会这些 K8S是云原生技术的典型代表,后续的课程当中我们也会大量用到 K8S 技术,如果对 K8S 基础比较弱的同学,切记盲目的去花大量的时间学习 K8S,先掌握以下基本内容,然后其余的部分跟着课程学习即可:
Docker的使用
K8S架构设计及其环境搭建
Deployment的使用
Service的使用
ConfigMap的使用
限于篇幅,这里不会对技术的细节做说明,小伙伴们根据知识点去查询相关的资料即可。
Docker的使用 Docker的使用需要同学掌握以下内容:
Dockerfile编写
常用的docker命令
docker-compose的使用
K8S架构设计及其环境搭建 K8S架构设计及其环境搭建需要同学会以下内容:
K8S由哪些组件构成,组件之间是如何协同工作的
minikube搭建 K8S 学习或测试环境
kubeadm搭建生产环境
Deployment的使用 Deployment是 K8S 下用的最多资源定义,同学需要掌握以下内容:
创建Deployment,并且了解常用的Deployment定义参数
Deployment版本回滚操作
了解Deployment的什么周期
推荐阅读:K8S官方文档Deployment部分
Service的使用 Service是一种可以访问 Pod 逻辑分组的策略, Service通常是通过 LabelSelector 访问 Pod 组。利用 Service 就能对外暴露服务。
同学需要知道 Service 的常用操作:
(必学)ClusterIp <只能是集群内部访问,可以通过proxy让外部访问>
(必学)NodePort <NodePort来暴露服务让外部访问>
(选学)LoadBalancer <生产环境一般都是使用LoadBalancer的方式>
(选学)Ingress <通过域名访问的方式>
ConfigMap的使用 ConfigMap 就是为了让镜像和配置文件解耦。好比一个动态的数据源,创建后可以在创建 Deployment 的时候指定用它。然后你想要动态更新,容器内也能监听到文件内容更改,进行热重载。
K8S的另外一个类似的功能叫 Secret,Secret类似于 ConfigMap,数据是用Base64加密,密文显示,一般存放敏感数据。